Friday, October 30, 2009

Sothink Photo Album Maker - ఫ్లాష్ ఫోటో ఆల్బమ్స్ తయారుచేసుకోవటానికి ...

Sothink Photo Album Maker అనే ఫ్రీవేర్ ని ఉపయోగించి ప్రొఫెషనల్ లుకింగ్ స్లైడ్ షో ఫ్లాష్ ఆల్బమ్స్ తయారుచేసుకోవచ్చు. ఆల్బమ్స్ తయారుచేసుకోవటానికి ఈ ప్రోగ్రామ్ లో బిల్ట్-ఇన్ టెంప్లేట్స్ ఉన్నాయి. దీనిని ఉపయోగించటం సులువు మరియు ఇది jpeg, jpg, bmp మరియు png ఇమేజ్ ఫార్మేట్లను సపోర్ట్ చేస్తుంది. అంతే కాకుండా ఫోటో ఎడిటింగ్ ఫంక్షన్లు కూడా ఈ ప్రోగ్రామ్ లో వున్నాయి. మీ ఆల్బమ్ కి బ్యాక్ గ్రౌండ్ మ్యూజిక్ కూడా జత చేసుకోవచ్చు.
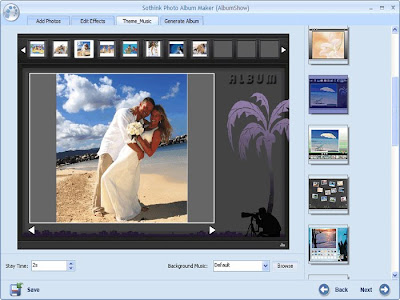


Sothink Photo Album Maker ఫీచర్లు:

౧. The photo formats can be *.jpeg, *.jpg, *.bmp, *.png, etc.
౨. Free to Crop, Rotate, Mirror the photo as well as set Saturation, Brightness and Red-eye Removal.
౩. Add favorite background music and set unique album style to personalize your album.
౪. Generate the album as SWF/EXE, or directly upload the generated album to Sothink photo album sharing site.

మరింత సమాచారం కోసం Sothink Photo Album Maker సైట్ చూడండి.


డౌన్లోడ్: Sothink Photo Album Maker

ధన్యవాదాలు

Wednesday, October 28, 2009

DriveImage XML V2.12 - హార్డ్ డిస్క్ లాజికల్ డ్రైవ్స్ మరియు పార్టీషన్స్ ని బ్యాక్ అప్ తీసుకోవటానికి...

DriveImage XML అనే ఉచిత అప్లికేషన్ ని ఉపయోగించి మొత్తం డిస్క్ లేదా కావలసిన పార్టీషన్ ని బ్యాక్ అప్ తీసుకోవచ్చు మరియి RAID డ్రైవ్ లను కూడా బ్యాక్ అప్ తీసుకొనే సదుపాయం కలదు. సిస్టం క్రాష్ అయినప్పుడు బ్యాక్ అప్ నుండి డాటా రీస్టోర్ కూడా చేసుకోవచ్చు.

Product Highlights:
- Backup logical drives and partitions to image files
- Browse images, view and extract files
- Restore images to the same or a different drive
- Copy directly from drive to drive
- Schedule automatic backups
- Run DriveImage from WinPE boot CD-ROM

DriveImage XML ని ఉపయోగించే విధానాన్ని క్రింద యివ్వబడిన వీడియో లో చూడండి:


ఇది Windows XP, 2003, Vista, లేదా Windows 7 లలో పనిచేస్తుంది

డౌన్లోడ్: DriveImage XML (సైజ్: 1.78 MB)

ధన్యవాదాలు

Monday, October 26, 2009

Ninite - కావలసిన విండోస్ అప్లికేషన్లను సెలెక్ట్ చేసుకొని ఒకే ఒక క్లిక్ తో ఇనస్టలేషన్ చేసుకో్వటానికి...

Ninite వెబ్ సైట్ లో కొన్ని ఉచిత విండోస్ అప్లికేషన్లను పొందుపర్చారు... వాటిలో కావలసిన విండోస్ అప్లికేషన్లను సెలెక్ట్ చేసుకొని ఒకే ఒక క్లిక్ తో ఇనస్టలేషన్ చేసుకోవచ్చు. Ninite విండోస్ ఎక్స్పీ, విస్టా, 7 లలో రన్ అవుతుంది. Web Browsers, Messaging, Media, Imaging, Documents, Anti-Virus, Runtimes, File Sharing, Other, Utilities, Compression, Developer Tools యిలా వివిధ క్యాటగిరీల్లో ఉపయోగకరమైన వివిధ అప్లికేషన్లు ఉన్నాయి.


క్రొత్తగా ఆపరేటింగ్ సిస్టం ఇనస్టలేషన్ చేసిన తర్వాత వివిధ అప్లికేషన్లను ఇనస్టలేషన్ చేసుకొనే వారికి Ninite బాగా ఉపయోగపడుతుంది.

ధన్యవాదాలు

gcal2excel - Google Calendar To Excel Converter

gcal2excel అనే జావా ఆధారిత డెస్క్ టాప్ అప్లికేషన్ ని ఉపయోగించి రెండు తేదీల మధ్య వున్న గూగుల్ క్యాలెండర్ ఈవెంట్లను మైక్రోసాప్ట్ ఎక్సెల్ లోకి డౌన్లోడ్ చేసుకోవచ్చు. gcal2excel ని ఇనస్టలేషన్ చెయ్యవలసిన అవసరం లేదు, సైట్ నుండి జిప్ ఫైల్ డౌన్లోడ్ చేసుకొని అన్ జిప్ చేసి Gcal2Excel అనే అప్లికేషన్ ని రన్ చేస్తే క్రింద చూపబడిన విండో వస్తుంది. అక్కడ జీ మెయిల్ యూజర్ నేమ్, పాస్ వార్డ్, గూగుల్ క్యాలెండర్ ఐడి మరియు ఏతేదీల మధ్య అయితే ఈవెంట్లను డౌన్లోడ్ చేసుకోవాలో ఆ తేదీలను ఎంటర్ చేసి క్రిందవున్న ’Create' పై క్లిక్ చెయ్యాలి. అంతే ఇచ్చిన రెండు తేదీల మధ్యవున్న గూగుల్ క్యాలెండర్ ఈవెంట్లు ఎక్సెల్ లోకి మార్చబడతాయి. మెయిన్ అప్లికేషన్ వున్న ఫోల్డర్ లోనే ఎక్సెల్ ఫైల్ కూడా సేవ్ చెయ్యబడుతుంది.


డౌన్లోడ్: gcal2excel (3MB)

ధన్యవాదాలు

Friday, October 23, 2009

SmartScreen Filter - ఇంటర్నెట్ ఎక్స్ ప్లోరర్ 8 లోని సేఫ్టీ ఫీచర్

SmartScreen Filter ఇంటర్నెట్ ఎక్స్ ప్లోరర్ 8 లో ఒక మంచి సేఫ్టీ ఫీచర్... ఇంటర్నెట్ ఎక్స్ ప్లోరర్ లోని SmartScreen Filter ని ఎనేబుల్ చెయ్యటం ద్వారా Phishing attacks, ఆన్ లైన్ ఫ్రాడ్ మరియు వివిధ సైట్ల నుండి వ్యాపించే malicious software/ మాల్వేర్ల నుండి రక్షణ పొందవచ్చు. దీనిని ఎనేబుల్ చెయ్యటానికి ఇంటర్నెట్ ఎక్స్ ప్లోరర్ 8 ని ఓపెన్ చేసి Safety ఆప్షన్ కి వెళ్ళి అక్కడ వున్న SmartScreen Filter ఆప్షన్ సెలెక్ట్ చేసుకొని అక్కడ వున్న Turn On SmartScreen Filter పై కిక్ చెయ్యగా వచ్చే Microsoft SmartScreen Filter డైలాగ్ బాక్స్ లో ’OK' క్లిక్ చెయ్యాలి.


SmartScreen Filter is a feature in Internet Explorer that helps detect phishing websites. SmartScreen Filter can also help protect you from installing malicious software or malware, which are programs that demonstrate illegal, viral, fraudulent, or malicious behavior.

SmartScreen Filter helps to protect you in three ways:

౧.It operates in the background as you browse the web, analyzing webpages and determining if they have any characteristics that might be suspicious. If it finds suspicious webpages, SmartScreen will display a message giving you an opportunity to provide feedback and advising you to proceed with caution.

౨.SmartScreen Filter checks the sites you visit against an up-to-the-hour, dynamic list of reported phishing sites and malicious software sites. If it finds a match, SmartScreen Filter will show you a red warning notifying you that the site has been blocked for your safety.

౩. SmartScreen Filter also checks files downloaded from the web against the same dynamic list of reported malicious software sites. If it finds a match, SmartScreen Filter will show a red warning notifying you that the download has been blocked for your safety.

ధన్యవాదాలు

Thursday, October 22, 2009

FolderSize - హార్డ్ డిస్క్ లోని ఫోల్డర్ల సైజ్ మరియు అవి ఆక్రమించిన స్పేస్ తెలుకోవటానికి పోర్టబుల్ అప్లికేషన్

FolderSize అనే పోర్టబుల్ అప్లికేషన్ ని ఉపయోగించి హార్డ్ డిస్క్ లో వున్న ఫోల్డర్ల సైజ్ మరియు అవి ఆక్రమించిన స్పేస్ తెలుకోవచ్చు. సెలెక్ట్ చేసుకున్న డ్రైవ్ ని వేగంగా ఎనలైజ్ చేసి ఫోల్డర్ వారీగా ఫలితాన్ని గ్రాఫికల్ రూపంలో చూపిస్తుంది. దీంతో హార్డ్ డిస్క్ లో ఏ ఫోల్డర్ ఎక్కవ ప్రదేశాన్ని ఆక్రమించిందో తెలుసుకోవచ్చు.


ఈ అప్లికేషన్ Windows Presentation Foundation (WPF) ఆధారంగా రూపొందించబడినది. మరింత సమాచారం మరియు అప్లికేషన్ డౌన్లోడ్ కొరకు FolderSize సైట్ ని చూడండి.

ధన్యవాదాలు

Tuesday, October 20, 2009

బ్లాగింగ్ ట్యుటోరియల్స్ మరియు ఉచిత టెంప్లేట్స్ కోసం ఒక మంచి సైట్

మీరు క్రొత్తగా బ్లాగ్ ని ప్రారంభించాలను కొంటున్నారా... ఆల్రెడీ వున్న బ్లాగ్ ని అందంగా మరియు ఆకర్షణీయంగా తీర్చిదిద్దాలనుకొంటే కనుక బ్లాగింగ్ ట్యుటోరియల్స్ మరియు ఉచిత టెంప్లేట్స్ కోసం http://www.blogspottutorial.com/ సైట్ ని సందర్శించండి. ఇక్కడ ట్యుటోరియళ్ళు సచిత్రంగా స్క్రీన్ షాట్ల తో స్టెప్ బై స్టెప్ సులభంగా అర్ధమయ్యేరీతిలో ఉంటాయి. అలానే ఉచిత టెంప్లేట్స్ ని కూడా డౌన్లోడ్ చేసుకోవచ్చు.


ఇది బ్లాగర్స్ కి ఉపయోగపడే ఒక మంచి సైట్...

Blogger కీ బోర్డ్ షార్ట్ కట్స్:

[Ctrl] + [B] - Bold
[Ctrl] + [I] - Italic
[Ctrl] + [L] - Blockquote
[Ctrl] + [Z] - Undo
[Ctrl] + [Y] - Redo
[Ctrl] + [Shift] + [A] - Add hyperlink
[Ctrl] + [Shift] + [P] - Preview
[Ctrl] + [D] - Save as draft
[Ctrl] + [P] - Publish
[Ctrl] + [S] - Save
[Ctrl] + [G] - Indic script transliteration

ధన్యవాదాలు

విండోస్ 7 కీబోర్డ్ షార్ట్ కట్స్...

సిస్టం మీద పనిచేసేటప్పుడు కీబోర్డ్ షార్ట్ కట్స్ తెలిస్తే మౌస్ తో క్లిక్ చేసే దాని కన్నా వేగంగా పనిచెయ్యవచ్చు. విండోస్ 7 కి సంబంధించిన కొన్ని కీబోర్డ్ షార్ట్ కట్స్ గురించి ఇక్కడ తెలుసుకుందాం ...

Start-Menu Searches: Windows key

This carryover from Vista is arguably one of Windows’ must underused and undervalued features. A simple tap of the Windows key activates the Start menu, where you can type the first few letters of a program name, Control Panel setting, Word document, or whatever and then hit Enter to launch it. Why reach for the mouse?

Minimize (Almost) All Windows: Win + Home

This combo lets you send all open windows packing--except the one that’s currently active. Sure beats clicking Minimize on a bunch of individual windows. When you tap the shortcut a second time, it restores all previously open windows.

Make Windows Transparent: Win + Space

This is the keyboard equivalent of mousing over the transparency tool in the right corner of the System Tray--great for those times when you need to something on the desktop (like a gadget) but don’t want to minimize all your windows. After tapping Win-Space, your windows will stay see-through until you let go of the Windows key.

Quick-Launch Taskbar Apps: Win + (1-9)

As you know, Windows 7 makes it a snap to “pin” frequently used programs to the taskbar. But did you also know that these programs are automatically assigned a number and corresponding Windows-key shortcut? Just press Windows-1 to launch the first pinned program (the one closest to the Start button), Windows-2 to launch the next one, and so on. Fastest app-launching known to man! Except, of course, for this…

Quick-Launch Any App: Hotkey

Like Vista before it, Windows 7 lets you assign a quick-launch hotkey to any installed program. Just right-click the program’s icon, choose Properties, and then click the Shortcut tab. Click once in the Shortcut key field, then press the hotkey combo you want to assign (Ctrl-Shift-H, for instance). Click OK and you’re done! Assuming you have a good memory, app launching doesn’t get any faster than this.

Dock Active Windows: Win + Left or Right Arrow

A great shortcut for users with widescreen monitors, this combo docks the active window to the left or right half of the screen (depending on which arrow you tap), at the same time maximizing it top-to-bottom.

Magnify Your View: Win + (+)

Windows 7’s built-in magnifier lets you zoom in wherever you place your cursor. Just tap Win-plus (that’s the Windows key and the plus key) to enable the magnifier and set a 200% zoom level. When you mouse to any edge of the screen, your view scrolls accordingly. The more you tap the keys, the higher the zoom. Of course, you can just as easily zoom out again with Win-minus.

Open Presentation Settings: Win + P

Good news for business users constantly struggling to get Windows to cooperate with projectors: A quick tap of Win-P activates a monitor-settings panel. Click Duplicate or Projector only to send your display to the big screen, or Extend if you’ve connected a second monitor and want extra screen real estate.

Create a New Folder: Ctrl + Shift + N

Forget the old way of creating new folders. In Windows 7, all it takes is a tap of Ctrl-Shift-N. This works in any open Explorer window, but also on the desktop. After the new folder appears, just type in a name as usual and hit Enter.

Bring Gadgets to the Fore: Win + G

Now that Windows’ gadgets are no longer relegated to the Sidebar, they’re free to sit anywhere on your desktop. Of course, that means they can get obscured by other windows. As you now know, a tap of Win-Space makes those windows temporarily see-through, but what if you want to put the gadgets on top of your windows? No problem: Just tap Win-G.

మూలం: పీసీ వార్ల్డ్

ధన్యవాదాలు