Showing posts with label పిసి చిట్కాలు. Show all posts

Tuesday, October 16, 2012

చదవగానే అదృశ్యమయ్యే సీక్రెట్ మెసేజెస్ పంపాలా?

పాస్ వార్డ్స్ లేదా ఏదైనా రహస్యసమాచారం కావలసిన వారికి పంపినపుడు, అది వారు చదవగానే అదృశ్యమవ్వాలా? అయితే మీరు డిజిటల్ ఇస్పిరేషన్ రూపొందించిన గూగుల్ షీట్ ని మీ అకౌంట్ లో కాపీ చేసుకొని, ఆషీట్ లో ఎక్కడైనా రహస్య సమాచారాన్ని టైప్ చేసి 'Share' బటన్ పై క్లిక్ చేసి కావలసిన వారికి మెయిల్ పంపవచ్చు. షేర్ విండో లో పర్మిషన్ 'Can Edit' ఉండేలా చూసుకోవాలి. మనం పంపిన మెయిల్ రిసీవ్ చేసుకున్న వారు మనం పంపిన గూగుల్ షీట్ లోని సమాచారాన్ని పది సెకన్లలో చదవాలి, పది సెకన్ల తర్వాత అక్కడ సమాచారం అదృశ్యమయ్యేలా గూగుల్ షీట్ కి గూగుల్ అప్స్ స్క్రిప్ట్ జతచెయ్యబడింది.  


మరింత సమాచారం కోసం డిజిటల్ ఇస్ఫిరేషన్ సైట్ చూడండి.
గూగుల్ షీట్
ధన్యవాదాలు

Monday, August 27, 2012

మీ డ్రాప్ బాక్స్ అకౌంట్ ని 2 స్టెప్ వెరిఫికేషన్ తో భద్రపర్చుకోండి!!!

ఆన్‍లైన్ లో మన అకౌంట్ల ను సురక్షితంగా ఉంచుకోవటం ప్రశ్నార్ధంగా మారుతున్న తరుణం లో 2 స్టెప్ వెరిఫికేషన్ ఆవశ్యకత ఎంతో ఉంది. ఇప్పటికే ఈ సదుపాయం గూగుల్ లో ఉంది. ఇప్పటికీ మీ గూగుల్ అకౌంట్ కి 2 స్టెప్ వెరిఫికేషన్    పెట్టుకోని వారికి ఎలా పెట్టుకోవాలో ఇక్కడ చూడండి.  గూగుల్ అకౌంట్ లానే ఎన్నో వ్యక్తిగత ఫైళ్ళను క్లౌడ్ లో స్టోర్ చేసుకోవటానికి మనం ప్రముఖంగా ఉపయోగించే Dropbox ని కూడా  2 స్టెప్ వెరిఫికేషన్ సురక్షితంగా ఉంచుకోవచ్చు.


 2 స్టెప్ వెరిఫికేషన్ కాన్ఫిగర్ చేసుకున్న తర్వాత గూగుల్ లానే 6 డిజిట్ సెక్యూరిటీ కోడ్ మన మొబైల్ కి టెక్స్ట్ మెసేజ్  రూపం లో పంపబడుతుంది.  

ఇక 2 స్టెప్ వెరిఫికేషన్ ని ఎనేబుల్ చేసుకోవటానికి ఇక్కడ క్లిక్ చెయ్యండి. డాప్ బాక్స్ అకౌంట్ సైన్ ఇన్ అయిన తర్వాత క్రింద Account sign in దగ్గర 2 Step Verification  దగ్గర Change పై క్లిక్ చెయ్యాలి. తర్వాత Get Started పై క్లిక్ చేసి డ్రాప్ బాక్స్ పాస్ వర్డ్ ఎంటర్ చెయ్యగా వచ్చే రెండు ఆప్షన్లలో టెక్స్ట్ మెసేజ్ పొందటానికి మొదటిటానికి మొబైల్ అప్లికేషన్ కోసం రెండవదానిని ఎంచుకోవాలి, Next పై క్లిక్ చెయ్యాలి.  ఇక్కడ మన దేశం (India) కోడ్ ని సెలెక్ట్ చేసుకొని మన మొబైల్ నంబర్ ఎంటర్ చెయ్యాలి. ’Next' పై క్లిక్ చేసిన తర్వాత 6 డిజిట్ కోడ్ మన మొబైల్ కి పంపబడుతుంది దానిని అక్కడ ఎంటర్ చెయ్యాలి. తర్వాత ఎమర్జెన్సీ  బ్యాకప్ కోడ్ జెనెరేట్ అవుతుంది, దానిని ఎక్కడైనా జాగ్రత్తగా నోట్ చేసుకుని ఉంచుకోవాలి. ఎప్పుడైనా మన మొబైల్ ఫోన్ పోయినప్పుడు ఇది ఉపయోగపడుతుంది. తర్వాత Enable two-step verification పై క్లిక్ చెయ్యాలి అంతే.

ధన్యవాదాలు

Saturday, August 18, 2012

గూగుల్ సెర్చ్ రిజల్ట్స్ లో అనవసరమైన సైట్లు రాకుండా బ్లాక్ చెయ్యటం ఎలా?

Personal Blocklist అనే గూగుల్ క్రోం ఎక్స్‌టెన్షన్ ని ఉపయోగించి గూగుల్ సెర్చ్ రిజల్ట్స్ లో అనవసరమైన వెబ్ సైట్లను బ్లాక్ చెయ్యవచ్చు. అలా చెయ్యటానికి ఈక్రింది చిత్రం లో చూపిన విధంగా బ్లాక్ లింక్ పై క్లిక్ చెయ్యాలి.


మరొక పద్ధతి గూగుల్ వెబ్ డాష్ బోర్డ్ కి వెళ్ళి మాన్యువల్ గా ఒక్కొక్కసారి ఒక్కొక్క వెబ్ సైట్ ని బ్లాక్ చెయ్యవచ్చు, ఇలా గరిష్టంగా 500 వెబ్ సైట్ల వరకు బ్లాక్ చేసుకోవచ్చు. ఇలా బ్లాక్ చెయ్యబడిన వెబ్ సైట్లు సెర్చ్ రిజల్ట్స్ లో చూపబడవు.

Google Custom Search ని క్రియేట్ చేసుకోవటం ద్వారా మనకు కావలసిన సైట్లను సెర్చ్ రిజల్ట్స్ లో పొందవచ్చు.


ముస్లిం సోదరులకు రంజాన్ శుభాకాంక్షలు...

ధన్యవాదాలు

Thursday, June 7, 2012

లేజర్ ఎలా పనిచేస్తుందో తెలుసుకోవాలా?

లేజర్ ని కంప్యూటర్లలో, సూపర్ మార్కెట్లలో , హాస్పటళ్ళలో ఇలా వివిధ చోట్ల వివిధ అవసరాలకు ఉపయోగిస్తూ ఉంటారు ... అసలు లేజర్ లైట్ ఎలా పనిచేస్తుందో ఈ క్రింది వీడియో లో చూడండి:


మరిన్ని సైన్స్ మరియు సాంకేతిక వీడియోలను చూడటానికి EngineerGuy సైట్ చూడండి.

ధన్యవాదాలు

Tuesday, May 29, 2012

అన్ని బ్రౌజర్లకూ ఉపయోగపడే కీబోర్డ్ షార్ట్ కట్స్!!!

ప్రముఖ వెబ్ బ్రౌజర్లైన Mozilla Firefox, Google Chrome, Internet Explorer, Apple Safari, లేదా Opera లలో కామన్ గా ఉన్న కీబోర్డ్ షార్ట్ కట్స్ ని ఇక్కడ చూడండి.


Tabs:
Ctrl+1-8 – Switch to the specified tab, counting from the left.
Ctrl+9 – Switch to the last tab.
Ctrl+Tab – Switch to the next tab – in other words, the tab on the right. (Ctrl+Page Up also works, but not in Internet Explorer.)
Ctrl+Shift+Tab – Switch to the previous tab – in other words, the tab on the left. (Ctrl+Page Down also works, but not in Internet Explorer.)
Ctrl+W, Ctrl+F4 – Close the current tab.
Ctrl+Shift+T – Reopen the last closed tab.
Ctrl+T – Open a new tab.
Ctrl+N – Open a new browser window.
Alt+F4 – Close the current window. (Works in all applications.)

Mouse Actions for Tabs:
Middle Click a Tab – Close the tab.
Ctrl+Left Click, Middle Click – Open a link in a background tab.
Shift+Left Click – Open a link in a new browser window.
Ctrl+Shift+Left Click – Open a link in a foreground tab.

Navigation:
Alt+Left Arrow, Backspace – Back.
Alt+Right Arrow, Shift+Backspace – Forward.
F5 – Reload.
Shift+F5 – Reload and skip the cache, re-downloading the entire website.
Escape – Stop.
Alt+Home – Open homepage.

Zooming:
Ctrl and +, Ctrl+Mousewheel Up – Zoom in.
Ctrl and -, Ctrl+Mousewheel Down — Zoom out.
Ctrl+0 – Default zoom level.
F11 – Full-screen mode.

Scrolling:
Space, Page Down – Scroll down a frame.
Page Up – Scroll up a frame.
Home – Top of page.
End – Bottom of page.
Middle Click – Scroll with the mouse.

Address Bar:
Ctrl+L, Alt+D, F6 – Focus the address bar so you can begin typing.
Ctrl+Enter – Prefix www. and append .com to the text in the address bar, and then load the website. For example, type howtogeek into the address bar and press Ctrl+Enter to open www.howtogeek.com.
Alt+Enter – Open the location in the address bar in a new tab.

Search:
Ctrl+K, Ctrl+E – Focus the browser’s built-in search box or focus the address bar if the browser doesn’t have a dedicated search box. (Ctrl+K doesn’t work in IE, Ctrl+E does.)
Alt+Enter – Perform a search from the search box in a new tab.
Ctrl+F, F3 – Open the in-page search box to search on the current page.
Ctrl+G, F3 – Find the next match of the searched text on the page.
Ctrl+Shift+G, Shift+F3 – Find the previous match of the searched text on the page.

History & Bookmarks:
Ctrl+H – Open the browsing history.
Ctrl+J – Open the download history.
Ctrl+D – Bookmark the current website.
Ctrl+Shift+Del – Open the Clear Browsing History window.

Other Functions:
Ctrl+P – Print the current page.
Ctrl+S – Save the current page to your computer.
Ctrl+O – Open a file from your computer.
Ctrl+U – Open the current page’s source code. (Not in IE.)
F12 – Open Developer Tools. (Not in Firefox.)

howtogeek నుండి సేకరించబడినది.

ధన్యవాదాలు

Friday, April 27, 2012

కంప్యూటర్లు ఉపయోగించేటప్పుడు కళ్ళ విషయం లో తీసుకోవలసిన జాగ్రత్తలు!!!

సర్వేంద్రియానాం నయనం ప్రధానం అన్నారు పెద్దలు.... కంప్యూటర్లు, టాబ్లెట్లు, స్మార్ట్ ఫోన్స్ మరియు ఇతర డివైజ్ లు ఎక్కువ సమయం ఉపయోగించేటప్పుడు కళ్ళకు సరైన జాగ్రత్తలు తీసుకోకపోవటం వలన తలనొప్పి రావటం, కళ్ళు ఎండిపోయి ఎర్రబారి మంటలు పుట్టటం మరియు చూపు చెదిరినట్లు అవటం మన గమనించే ఉంటాం.

ఈ ఆధునిక డిజిటల్ ప్రపంపచం లో కంప్యూటర్ లేదా ఇతర ఎలక్ట్రానిక్ డివైజ్ లు ఉపయోగించేటప్పుడు కళ్ళకు ఇబ్బందులు కలగకుండా తీసుకోవలసిన జాగ్రత్తలు గురించి ఈ క్రింది చిత్రాలలో చూడండి: 


Related Posts Plugin for WordPress, Blogger...మరింత సమాచారం కోసం ఇక్కడ చూడండి.


ధన్యవాదాలు
Thursday, February 16, 2012

గూగుల్ సెర్చ్ ఫీచర్ల గురించి షార్ట్ వీడియో !

గూగుల్ సెర్చ్ టీమ్ ఉపయోగకరమైన సెర్చ్ ఫీచర్లన్నిటినీ కలిపి ఒక చిన్న షార్ట్ వీడియోగా తయారు చేసింది. దానిని ఇక్కడ చూడండి:


గూగుల్ సెర్చ్ టిప్స్ అండ్ ట్రిక్స్ పై గతం లో నేను చేసిన పోస్ట్ ని ఇక్కడ చూడండి.

ధన్యవాదాలు

Friday, February 10, 2012

USB డ్రైవ్ లలో స్పేస్ ఫుల్ డాటా నిల్ అని చూపిస్తుందా?

ఒక్కొక్కసారి మన USB Drives (పెన్ డ్రైవ్, ఎక్స్ టర్నల్ హార్డ్ డిస్క్ డ్రైవ్, మెమొరీ కార్డ్ మొదలగునవి) లలో డాటా ఏమీ కనబడకుండా  డిస్క్ స్పేస్ మాత్రం ఫుల్ గా చూపిస్త్తూ ఉంటే దానికి వైరస్ లు కారణం కావచ్చు. వైరస్ లు మన డాటాని కనబడకుండా చేస్తాయి. అయితే ఒక్కొక్కసారి యాంటీ వైరస్ సాప్ట్ వేర్లతో స్కాన్ చేసినా కూడా ఫైళ్ళు కనబడకపోతే ఈ క్రింది విధంగా చెయ్యండి:

౧. ముందుగా USB Drive ని పీసీ కి కనెక్ట్ చెయ్యాలి. My Computer లో దాని డ్రైవ్ లెటర్ తెలుసుకోవాలి.

౨. Start---> Run కి వెళ్ళి cmd అని టైప్ చేసి Enter కొట్టండి. 

౩. కమాండ్ ప్రాంమ్ట్ వస్తుంది. అక్కడ USB Drive లెటర్ ప్రక్కన : టైప్ చేసి Enter చెయ్యాలి. (ఉదా మీ USB Drive letter I అయితే కనుక కమాండ్ ప్రాంమ్ట్ దగ్గర I: అని టైప్ చేసి ఎంటర్ చెయ్యాలి)

౪. ఇప్పుడు కమాండ్ పాంమ్ట్ దగ్గర ఈ క్రింది విధంగా కమాండ్ ఎంటర్ చెయ్యాలి

attrib -s -h /s /d *.*


పైన చెప్పిన కమాండ్ లో -s, -h, /s మరియు /d ల మధ్య ఒక స్పేస్ ఉండాలి. Enter కొట్టండి. కొన్ని సెకన్ల తర్వాత  తిరిగి కమాండ్ పాంమ్ట్ వస్తుంది. అప్పుడు USB Drive ని తొలగించి తిరిగి మరల కనెక్ట్ చెయ్యండి. అంతే ఇంతకు ముందు వైరస్ లచే దాచబడిన ఫైల్స్ మరియు పోల్డర్లు ఇప్పుడు కనిపిస్తాయి. ఇప్పుడు యాంటీ వైరస్ ప్రోగ్రామ్ లను రన్ చేసి వైరస్ లను క్లీన్ చేసుకోవచ్చు.

ధన్యవాదాలు
Thursday, February 9, 2012

జీమెయిల్ మరియు ఇతర గూగుల్ డాటా ని డౌన్లోడ్ చేసుకోవటం ఎలా?

మన డాక్యుమెంట్లు, ఫోటోలు, కాంటాక్ట్స్ , మెయిల్స్ మరియు ఇతర సమాచారం ఎక్కువగా ఆన్ లైన్ లోనే స్టోర్ చేస్తూ ఉంటాం.  ఒక్కసారి ఆ సర్వర్లు డౌన్ అయితే మన పరిస్థితి ఏమిటి? ఈ రోజు ఉచితం రేపు పెయిడ్ ఐతే ఏం చెయ్యాలి?  యూఎస్ ప్రభుత్వం మెగాఅప్ లోడ్ ని సీజ్ చేసినప్పుడు మెగా అప్ లోడ్ సర్వర్లలోని డాటా ని చాలా మంది కోల్పోయారు. గూగుల్ ప్రైవసీ పాలసీ మరియు అమెరికా SOPA/PIPA చట్టాలు... మన డాటా ని మనమే జాగ్రత్త చేసుకోవటం మన బాధ్యత అని తెలియచేస్తున్నాయి. 


అయితే జీమెయిల్ మరియు ఇతర గూగుల్ అకౌంట్లలో ఉన్న మన డాటాని డౌన్లోడ్ చేసుకోవటానికి Google Takeout అనే వెబ్ సర్వీస్ ఉపయోగపడుతుంది. దీని గురించి మరింత సమాచారాన్ని ఇక్కడ చూడండి. 


అలానే Mozilla Thunderbird అనే ఈ- మెయిల్ క్లైంట్  సహాయంతో మన జీమెయిల్ ని మన పీసీ లోనే పొందవచ్చు. దీని  గురించి గతం లో చేసిన పోస్ట్ ఇక్కడ చూడండి. 

ధన్యవాదాలు

Friday, November 25, 2011

2-step verification సహాయంతో మీ గూగుల్ అకౌంట్ ని సురక్షితంగా ఉంచుకోండి!

ఒక్క గూగుల్ అకౌంట్ తో మనం వివిధ వెబ్ సైట్లలో సైన్-ఇన్ అవుతూ ఉంటాం ...ఒక్కొక్కసారి పబ్లిక్ లేదా షేర్డ్ పీసీ లలో సైన్-ఇన్ కూడా అవ్వటం జరుగుతుంది. కాబట్టి మన గూగుల్ అకౌంట్ సురక్షితంగా ఉంచుకోవటం కోసం 2-step verification సహాయపడుతుంది. దీనిని సెట్ చేసుకోవటం కోసం గూగుల్ అకౌంట్ సైన్-ఇన్ అయిన తర్వాత ’Account Settings' కి వెళ్ళి అక్కడ 'Security' దగ్గర ఉన్న 'Using 2-step verification ' పై క్లిక్ చేసి ’Start Setup' పై క్లిక్ మీ మొబైల్ నంబర్ ఎంటర్ చేసి కోడ్స్ Text లేదా  Voice Call ఏదికావాలో సెలెక్ట్ చేసుకొని ’Send Code' పై క్లిక్ చేస్తే కోడ్ మొబైల్ కి పంపబడుతుంది, దానిని 'Enter Code...' దగ్గర ఎంటర్ చేసి ’Verify' పై క్లిక్ చెయ్యాలి. తర్వాత స్టెప్ లో కోడ్ కంప్యూటర్ గుర్తు పెట్టుకోవాలా వద్దా అనే చెక్ బాక్స్ వస్తుంది, బాక్స్ చెక్ చేస్తే కోడ్ 30 రోజులవరకు ఎంటర్ చెయ్యవలసిన పనిలేదు. అయితే పబ్లిక్ లేదా షేర్డ్ పీసీ లలో ఈ ఆప్షన్ ని ఎంచుకోవద్దు. తర్వాత Turn on 2-step verification పై క్లిక్ చేస్తే సెటప్ పూర్తి అవుతుంది.

ఇది ఎలా పనిచేస్తుందో ఈ క్రింది వీడియో లో చూడండి:


2-step verification పై మరింత సమాచరం కోసం గూగుల్ సైట్ చూడండి.

ధన్యవాదాలు
Wednesday, November 16, 2011

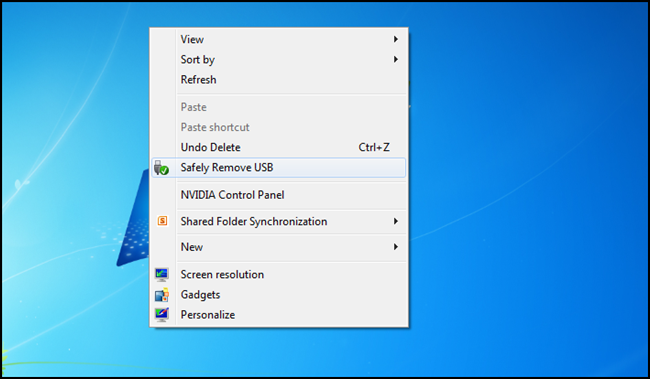
Desktop Context Menu నుండే USB డ్రైవ్ లను సురక్షితంగా తొలగించటానికి!


sshot-3
If you are one of those people who don’t safely remove their USB Devices just because you’re lazy, here’s a neat trick to do it from the context menu on your desktop. Even if you are not lazy and just forget, the icon will serve as a mental reminder. So let’s take a look.

The Safely Remove Hardware Dialog Method

This method will bring up the Safely Remove Hardware dialog box, from there you can choose which USB device you wish to eject. If you are looking to eject a specific USB drive take a look at the next section.
Press Win+R to bring up a run box and type regedit to open the registry.
When the registry is open, navigate to
HKEY_CLASSES_ROOT\DesktopBackground\Shell\
Right click on the shell key and create a new key called Safely Remove Hardware.
Once the new key is created, create a new string value, and call it Icon.
Double click on the icon string, in the Value data field type the following:
hotplug.dll,-100
Now right click on the Safely Remove Hardware key that you just created and create another key,  this time name the key command.
Once the new key has been created select it to open see the keys values.
This key will have a value called Default, double click on it to edit it, in the Value data field type
C:\\Windows\\System32\\control.exe hotplug.dll
That’s all there is to it if you want the Safely Remove Hardware dialog to appear.

Ejecting a Specific USB Drive

If you are looking to eject a drive with a specific name or drive letter then this method is better suited for you.
Head over to the developers website and grab a copy of the latest version of  USB Disk Ejector.
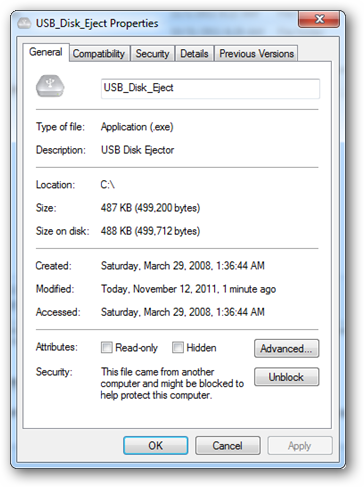
Extract the file somewhere (for illustration we’ll extract to the root of the C:\ drive), then right click on the file, select properties, and click the unblock button in the bottom right hand corner of the dialog.
Press Win+R to bring up a run box and type regedit to open the registry.
When the registry is open navigate to:
HKEY_CLASSES_ROOT\DesktopBackground\Shell\
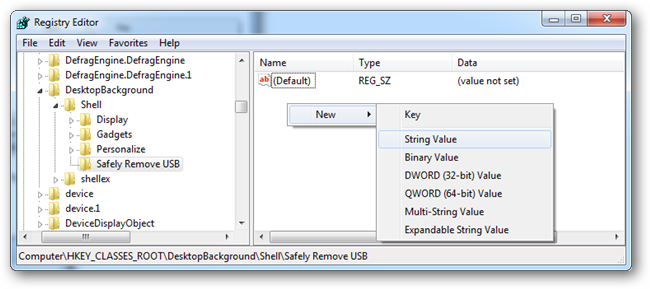
Right click on the shell key and create a new key called Safely Remove USB.
Once the new key is created create a new string value, and call it Icon.
Double click on the icon string and in the Value data field type the following:
hotplug.dll,-100
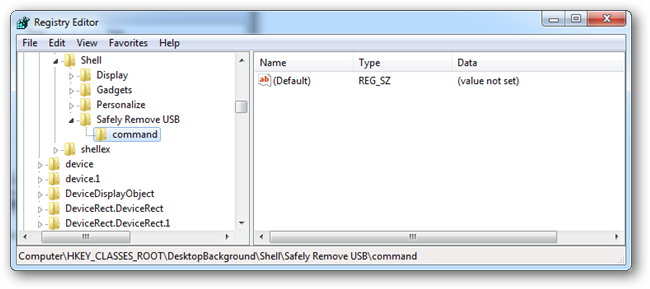
Now right click on the Safely Remove USB key that you just created and create another key,  this time name the key command.
Once the new key has been created select it to open see the keys values.
This key will have a value called Default, double click on it to edit it. Here we have a few options, which ever method below suites you best should be typed into the Value data field.
Note: Remember to replace the name or drive letter in the following example to the name or drive letter of YOUR USB device.
We can either eject a USB with a certain name by typing.
C:\usb_disk_eject /removename “Memorex USB”
We could also eject a USB with a certain driver letter, in my case drive G.
C:\usb_disk_eject /removeletter G
That’s all there is to it.

సేకరణ:హౌటుగీక్ నుండి
ధన్యవాదాలు

Saturday, August 13, 2011

జీమెయిల్ మరియు గూగుల్ డాక్స్ తో మెయిల్ మెర్జ్ క్రియేట్ చెయ్యటం ఎలా!!!

A mail merge program helps you send personalized email messages to multiple contacts in one go. Each message has the same content but some parts of the message can be customized – like you can greet each recipient by their first name.
Gmail Mail MergeWho needs Mail Merge? If you are organizing a party at your home, you can send personalized email invitations to all your friends with the help of mail merge. A person like Steve Jobs - see the following video - can use mail merge to effortlessly invite his inner circle for the launch of a new product.

How to Create Mail Merge with Gmail

Microsoft Outlook with Word has Mail Merge functionality built-in but if you are a Gmail or Google Apps user, you may still use mail merge easily with the help of Google Docs.
And though the Mail Merge program using Google Docs, this is not limited to Gmail users. If you have linked your Hotmail or Yahoo! account with a Google Account, you may use that or any non-Gmail address with Mail Merge as well.

Mail Merge with File Attachments - Step by Step

This new version of Gmail Mail Merge program offers support for rich-text (HTML) email templates, you may add file attachments with the outgoing messages, there’s an option to BCC emails to yourself and better overall usability. Let’s get started:
Step 1: Open this Google spreadsheet and create a copy of the same in your Google Docs account (File –> Make a Copy).
Step 2: Under the new “Mail Merge” menu, click on “Reset” to clear the canvas and also authorize Google Docs to access your Gmail and Google Contacts.
Step 3: Open Google Contacts and create a new Group with all the contacts who you would like to send a personalized email. Alternatively, you may simply add the recipient’s name and email addresses manually in the Google Sheet.
Step 4: Click Mail Merge –> Import Google Contacts and type the name of the Google Contacts group that you created in Step 3. Google Docs will now automatically import all the relevant Gmail contacts into the spreadsheet.
Step 5: Fill the various fields of the email template (highlighted in white).
5a. You can compose an email template in rich text using the HTML Mail tool and then copy-paste the generated HTML code into the message body field of the Google Sheet.
5b. If you would like to add an attachment to your email messages – say a PDF file or an Office document – just upload that file to Google Docs and copy-paste the ID of the file into the Attachment ID field. You can find the ID of a Google Docs file in its URL.
mail merge
Step 6: Go to the Mail Merge menu again and click “Start Mail Merge” – the status against the names of your Gmail contacts will change to “OK” for all email messages that were successfully delivered through Google Docs.
That’s it! You’ve just completed your first mail merge through Gmail and Google Docs.
Please note that Gmail has a daily sending limit and any messages that are dispatched using the Gmail Mail Merge program also count in that limit. You can send a maximum of 500 messages in a day and if you exceed that number, Google can temporarily lock your Gmail account.

సేకరణ: Digital Inspiration నుండి

Wednesday, August 3, 2011

Filefly - ఫేస్ బుక్ లో ఫైళ్ళను షేర్ చేసుకోవటానికి!!!

Filefly అనే ఫేస్ బుక్ అప్లికేషన్ ని ఉపయోగించి ఫేస్ బుక్ లో కావలసిన వారితో 2GB సైజ్ వరకు ఫైళ్ళను షేర్ చేసుకోవచ్చు.

ముందుగా ఫేస్ బుక్ Filefly అప్లికేషన్ పేజి కి వెళ్లి మన ఫేస్ బుక్ అకౌంట్ తో లాగిన్ అవ్వాలి. ఇప్పుడు Use Filefly బటన్ పై క్లిక్ చెయ్యాలి. తర్వాత ఆ అప్లికేషన్ కి పర్మిషన్ Grant చెయ్యాలి. అంతే ఈ క్రింది చిత్రం లో చూపిన విధంగా మెయిన్ స్క్రీన్  వస్తుంది. 

ఇక్కడ New Folder పై క్లిక్ చేస్తే క్రొత్త ఫోల్డర్ క్రియేట్ అవుతుంది, తర్వాత ఈ క్రింది చిత్రం లో చూపిన విధంగా Add Files, Invite Friends ఉంటాయి. Add Files పై క్లిక్ చేసి షేర్ చెయ్యవలసిన ఫైల్ ని మన పీసీ నుండి సెలెక్ట్ చేసుకోవాలి. 
Invite Friends బటన్ పై క్లిక్ చేసి మనం ఎవరితో అయితే ఫైల్ షేర్ చేసుకోవాలనుకుంటున్నామో వారిని ఫ్రెండ్స్ లిస్ట్ నూండి సెలెక్ట్ చేసుకొని ’Send Request' పై క్లిక్ చేస్తే వారికి నోటిఫికేషన్ పంపబడుతుంది. Publish on my.... దగ్గర చెక్ పెట్టడం ద్వారా మన షేర్ చేసిన విషయం వాల్ పై పబ్లిష్ చెయ్యబడుతుంది.
ఫ్రెండ్స్ వారికి వచ్చిన నోటిఫికేషన్ పై క్లిక్ చేస్తే Filefly కి వెళతారు వాళ్ళు కూడా Use Filefly చేస్తే FileFly మొదటి పేజ్ కి వెళతారు.
FileFly మెయిన్ స్క్రీన్ లో మనం షేర్ చేసిన ఫోల్డర్ వస్తుంది, దానిపై క్లిక్ చేసి దానిలోని ఫైళ్ళను చూడవచ్చు. ఒక్కొక ఫైల్ పై క్లిక్ చేస్తే డౌన్లోడ్ అవుతాయి.

సైట్: FileFly
ధన్యవాదాలు

Thursday, July 14, 2011

డ్రాప్ బాక్స్ లో ఫైళ్ళను శాశ్వతంగా తొలగించటానికి!!!

ఉచిత 2GB స్టోరేజ్ ని అందిస్తున్న Dropbox లో ఉన్నఒక మంచి అడ్వాంటేజ్ ఏమిటంటే పొరపాటున లేదా కావలసి తొలగించిన ఫైళ్ళను రీస్టోర్ చేసుకోవచ్చు. తర్వాత డిలీట్ చేసిన ఫైళ్ళను మరల రీస్టోర్ చేసుకోకుండా శాశ్వతంగా తొలగించటానికి ఈ క్రింది విధంగా చెయ్యాలి:

౧. ముందుగా Dropbox సైట్ కి వెళ్ళి లాగిన్ చెయ్యాలి . తర్వాత Show deleted files పై క్లిక్ చెయ్యాలి, అక్కడ మనం ఇంతకుముందు డిలీట్ చేసిన ఫైళ్ళు మరియు ఫోల్డర్లు చూపిస్తుంది.


౨. ఇప్పుడు డిలీట్ అయిన ఫైళ్ళను శాశ్వతంగా తొలగించటానికి వాటిని సెలెక్ట్ చేసుకుని  More పై క్లిక్ చేసి Permanently Delete పై క్లిక్ చెయ్యాలి. అంతే ఇక ఫైళ్ళు శాశ్వతంగా తొలగించబడతాయి.


ధన్యవాదాలు

Saturday, June 11, 2011

హార్డ్‌డిస్క్ పనితీరుని తెలుసుకోవాలని ఉందా? [వీడియో]

మన పీసీ లోని హార్డ్ డ్రైవ్ ఎలా పనిచేస్తుందా అని తెలుసుకోవాలని అందరికీ ఉంటుంది, హార్డ్ డ్రైవ్ పనితీరుని తెలుసుకోవటానికి  Engineer Guy Bill Hammack రూపొందించిన Computer Hard Drive Teardown వీడియోని ఇక్కడ చూడండి.


 ఇలాంటివే మరిన్ని వీడియోల కోసం Engineer Guy సైట్ చూడండి.


ధన్యవాదాలు

Saturday, June 4, 2011

వీడియోలను ఎలా షూట్ చెయ్యాలి? [వీడియో]

How to Shoot Video That Doesn't Suck బుక్ రచయిత Steve Stockman అందిస్తున్న సింపుల్ వీడియో షూటింగ్ టిప్స్ ఇక్కడ చూద్దాం!!


మరిన్ని చిట్కాల కోసం Steve's blog చూడండి.

ధన్యవాదాలు

Monday, May 9, 2011

లాప్ టాప్ ఉపయోగించేటప్పుడు ఏ విధంగా కూర్చోవాలి! [వీడియో]

మనం పీసీ/లాప్ టాప్ మీద పనిచేసేటప్పుడు సరైన విధంగా (posture) కూర్చోవాలి, లేకపోతే నడుం, మెడ , కాళ్ళు మొ. నొప్పులు వచ్చే అవకాశం ఉంది. ఆఫీస్ లేదా ఇంట్లో లేదా ప్రయాణాలలో లాప్ టాప్ ఉపయోగించే వారు  ఏ విధంగా కూర్చోవాలనే దానిపై వోడాఫోన్ విడుదల చేసిన చక్కని యానిమేటెడ్ వీడియోలను ఇక్కడ చూడండి.

Video A: Using a laptop at home or office


Video B: Using your laptop while travelling or in a hotel


ధన్యవాదాలు

Friday, May 6, 2011

మైక్రోసాప్ట్ సెక్యూరిటీ ఎస్సెన్షియల్స్ సిగ్నేచర్ డాటాబేస్ ఇప్పుడు ప్రాక్సీ ద్వారా కూడా అప్ డేట్ చేసుకోవచ్చు!!

మైక్రోసాప్ట్ వారి వైరస్, స్పైవేర్ మరియు మాల్వేర్ ప్రొటెక్షన్ సాప్ట్ వేర్ అయిన సెక్యూరిటీ ఎస్సెన్షియల్స్ సిగ్నేచర్ డాటాబేస్  డైరెక్ట్ ఇంటర్నెట్ కనెక్షన్ ఉంటేనే అప్ డేట్ అయ్యేది, లేదంటే కనుక డాటాబేస్ సెపరేట్ గా డౌన్లోడ్ చేసుకొని ఇనస్టలేషన్ చేసుకోవాల్సి వచ్చేది. నెట్ వర్క్ (LAN)  సిస్టం లో ఒక ఇంటర్నెట్ కనెక్షన్ తీసుకొని ప్రాక్సీ ద్వారా పీసీ లలో ఇంటర్నెట్ యాక్సెస్ చేస్తున్నా సెక్యూరిటీ ఎస్సెన్షియల్స్ సిగ్నేచర్ డాటాబేస్ ప్రాక్సీ ద్వారా అప్ డేట్ అయ్యేది కాదు.అయితే ఇప్పుడు  సెక్యూరిటీ ఎస్సెన్షియల్స్ ని  http://www.microsoft.com/en-in/security_essentials/default.aspx నుండి డౌన్లోడ్ చేసుకొని ఇనస్టలేషన్ చేసుకుంటే సిగ్నేచర్ డాటాబేస్ ప్రాక్సీ ద్వారా కూడా అప్ డేట్ అవుతుంది.


ఇంటర్నెట్ కనెక్షన్ లేని వాళ్ళు సిగ్నేచర్ డాటాబేస్ డౌన్లోడ్ చేసుకొని ఆఫ్ లైన్ లో ఇనస్టలేషన్ చేసుకోవటానికి, ఈ క్రింది లింకులను క్లిక్ చెయ్యండి:


ధన్యవాదాలు 

Wednesday, May 4, 2011

Google + 1 బటన్ గురించి తెలుసా?

మీరు ఫేస్‍బుక్ యూజర్లు అయితే కనుక మీకు Like గురించి తెలిసే ఉంటుంది, అటువంటిదే Google + 1 (ప్లస్ ఒన్) బటన్ కూడా.  గూగుల్ లో మనం సెర్చ్ చేసినప్పుడు వచ్చే సెర్చ్ రిజల్ట్స్ లో వెబ్ పేజీల  ప్రక్కన ఈ +1 బటన్ వస్తుంది, దాని పై క్లిక్ చేస్తే "I Like This Page" అని చెప్పినట్లే మరియు ఆ పేజీని మనం రికమెండ్ చేస్తున్నట్లు పబ్లిక్ గూగుల్ ప్రొపైల్ లో చూపుతుంది.

Google + 1 కి సంబంధించిన వీడియో ఇక్కడ చూడండి:


వీడియో చూశారు కదా! ఇప్పుడు గూగుల్ సెర్చ్ రిజల్ట్స్ లో  + 1 బటన్ రావాలంటే ఏమి చెయ్యాలో చూద్దాం .
౧. ముందుగా http://www.google.com/+1/button/ సైట్ కి వెళ్ళి అక్కడ ఉన్న  Opt in పై క్లిక్ చెయ్యాలి.


౨. ఇప్పుడు గూగుల్ ఎకౌంట్ తో సైన్ ఇన్ చెయ్యాలి, తర్వాత  Join this Experiment పై క్లిక్ చెయ్యాలి.


3.google.com కి వెళ్ళి మనకు కావల్సిన దానికై సెర్చ్ చెయ్యాలి. ఇప్పుడు సెర్చ్ రిజల్ట్స్ లో వెబ్ పేజీల ప్రక్కన +1 బటన్ ని చూడవచ్చు. 


4. మనకు నచ్చిన దాని ప్రక్కన ఉన్న ప్లస్ బటన్ పై క్లిక్ చెయ్యటం ద్వారా ఆ పేజీని మనం రికమండ్ చేసినట్లు గా మన పబ్లిక్ ప్రొఫైల్ లో చూపబడుతుంది. తర్వాత  Create Profile and  +1  పై క్లిక్ చెయ్యాలి అంతే.


ఇక నచ్చిన ప్రతి పేజి దగ్గర ఉన్న ప్లస్ బటన్ దగ్గర క్లిక్ చెయ్యటమే.

ధన్యవాదాలు

Tuesday, April 26, 2011

జీమెయిల్ క్రొత్త ఫీచర్: Background Send

మనం మెయిల్ కి జతచెయ్యబడిన అటాచ్మెంట్లు పెద్దవిగా ఉండటం లేదా సర్వర్లు స్లోగా ఉండటం వలన మెయిల్ పంపటానికి కొంత సమయం పట్టవచ్చు, అప్పటి వరకు మనం వేచి ఉండవలసి వస్తుంది. అయితే జీమెయిల్ క్రొత్త ఫీచర్ Background Send ని ఎనేబుల్ చెయ్యటం వలన 'Send' క్లిక్ చేస్తే పంపవలసిన మెయిల్ బ్యాక్ గ్రౌండ్ లో పంపబడుతుంది ఇక మనం వేరే మెయిల్ కంపోజ్ లేదా చదవటం ఇతరత్రా పనులు చేసుకోవచ్చు. అయితే మెయిల్ బ్యాక్ గ్రౌండ్ పంపటం పూర్తి అయ్యేవరకు జీమెయిల్ లాగిన్ చేసే ఉండాలి.


మరింత సమాచారం కోసం జీమెయిల్ అఫీషియల్ బ్లాగ్ చూడండి.

ధన్యవాదాలు