Monday, April 30, 2012

Nomesoft USB Guard తో USB Port లను బ్లాక్ చెయ్యండి...

Nomesoft USB Guard అనే ఉచిత USB బ్లాకింగ్ సాప్ట్ వేర్ ని ఉపయోగించి మన పీసీ లోని USB పోర్ట్ లను బ్లాక్ చెయ్యవచ్చు. ఈ అప్లికేషన్ లోని Disable the Use of USB ఆప్షన్ ని ఎంచుకోవటం ద్వారా పీసీ కి కనెక్ట్ అయిన USB డ్రైవ్ లను ఇతరులు యాక్సెస్ చెయ్యకుండా చెయ్యవచ్చు. అంతేకాకుండా ఒకేఒక క్లిక్ తో ఎనేబుల్ లేదా డిసేబుల్ మరియు రీడ్ లేదా రీడ్/రైట్ యాక్సెస్ ఇవ్వవచ్చు.


డౌన్లోడ్: Nomesoft USB Guard

ధన్యవాదాలు

Saturday, April 28, 2012

మైక్రోసాప్ట్ SkyDrive తో ఫైల్స్ సింక్ చెయ్యటానికి డెస్క్‌టాప్ అప్లికేషన్!!!

SkyDrive తో 25GB ఉచిత ఆన్ లైన్ స్టోరేజ్ ని అందించిన మైక్రోసాప్ట్  ఇప్పుడు క్రొత్త SkyDrive తో 7GB ఉచిత స్టోరేజ్ ని మాత్రమే అందిస్తుంది.  నా స్కైడ్రైవ్ లాగిన్ అయినప్పుడు ఇంతకు ముందు 25GB స్టోరేజ్ ఉండేది అది కాస్తా 7GB అయిపోయింది. Manage Storage పై క్లిక్ చేసి 25GB కి ఉచితంగా అప్‌గ్రేడ్ చేసుకున్నాను.  


SkyDrive ని పీసీ నుండే సులభంగా యాక్సెస్ చెయ్యటానికి మైక్రోసాప్ట్ డెస్క్‌టాప్ అప్లికేషన్ ని రూపొందించింది. దీనిని ఇనస్టలేషన్ చేసిన తర్వాత పీసీ లో స్కైడ్రైవ్ ఫోల్డర్ క్రియేట్ అవుతుంది. దీనిలో కాపీ చేసిన ఫైల్స్ ఆటోమాటిక్ గా skydrive.com సైట్ తో సింక్ చెయ్యబడుతుంది. దీంతో మన ఫైళ్ళను ఎప్పుడైనా ఎక్కడినుండైనా యాక్సెస్ చెయ్యవచ్చు. 


Features

  • Access your SkyDrive right from Windows Explorer—photos, documents, and all your other important files.
  • Quickly add new files to SkyDrive by dragging them to the SkyDrive folder.
  • Easily organize your files and folders in SkyDrive, just like any other folder.
  • Connect back to your PC if you forget to put something in SkyDrive.

SkyDrive ని ఉపయోగించటానికి విండోస్ లైవ్ ఐడీ అవసరం ఇది లేని వాళ్ళు ఒకటి క్రియేట్ చేసుకోవాలి. హాట్ మెయిల్ ఐడీ కూడా ఉపయోగించుకోవచ్చు. 

డౌన్లోడ్: SkyDrive 

ధన్యవాదాలు
Friday, April 27, 2012

కంప్యూటర్లు ఉపయోగించేటప్పుడు కళ్ళ విషయం లో తీసుకోవలసిన జాగ్రత్తలు!!!

సర్వేంద్రియానాం నయనం ప్రధానం అన్నారు పెద్దలు.... కంప్యూటర్లు, టాబ్లెట్లు, స్మార్ట్ ఫోన్స్ మరియు ఇతర డివైజ్ లు ఎక్కువ సమయం ఉపయోగించేటప్పుడు కళ్ళకు సరైన జాగ్రత్తలు తీసుకోకపోవటం వలన తలనొప్పి రావటం, కళ్ళు ఎండిపోయి ఎర్రబారి మంటలు పుట్టటం మరియు చూపు చెదిరినట్లు అవటం మన గమనించే ఉంటాం.

ఈ ఆధునిక డిజిటల్ ప్రపంపచం లో కంప్యూటర్ లేదా ఇతర ఎలక్ట్రానిక్ డివైజ్ లు ఉపయోగించేటప్పుడు కళ్ళకు ఇబ్బందులు కలగకుండా తీసుకోవలసిన జాగ్రత్తలు గురించి ఈ క్రింది చిత్రాలలో చూడండి: 


Related Posts Plugin for WordPress, Blogger...మరింత సమాచారం కోసం ఇక్కడ చూడండి.


ధన్యవాదాలు
డ్రాప్ బాక్స్ క్విక్ లింక్ తో ఇక ఫైల్ లేదా ఫోల్డర్ షేర్ చెయ్యటం చాలా సులువు...

ఉచిత ఆన్ లైన్ స్టోరేజీ ని అందిస్తున్న Dropbox లో ఇప్పుడు కావలసిన ఫైల్ లేదా ఫోల్డర్ మనకు కావలసిన వారితో షేర్ చేసుకోవటానికి ’Get Link' అనే ఆప్షన్ జత చెయ్యబడింది. డ్రాప్ బాక్స్ లో లాగిన్ అయ్యి షేర్ చెయ్యవలసిన ఫైల్ లేదా ఫోల్డర్ వరుసలో చివరన ఉన్న లింక్ గుర్తు పై క్లిక్ చెయ్యాలి. బ్రౌజర్ లో లింక్ ఓపెన్ అవుతుంది, అడ్రస్ బార్ లో ఉన్న లింక్ ని కాపీ చేసుకొని మీ ఫ్రెండ్స్ లేదా ఫ్యామిలీ తో షేర్ చేసుకోవచ్చు. అవతలి వారు సైన్-ఇన్ చెయ్యకుండానే మన ఫైల్ లేదా ఫోల్డర్ ని బ్రౌజర్ లో చూడగలరు.


మరింత సమాచారం కోసం డ్రాప్ బాక్స్ అఫీషియల్ బ్లాగ్ చూడండి.

ధన్యవాదాలు

Thursday, April 26, 2012

Google Drive - 5 GB ఉచిత స్టోరేజ్!!!


Google Drive. Keep everything. Share anything.

Access everywhere.

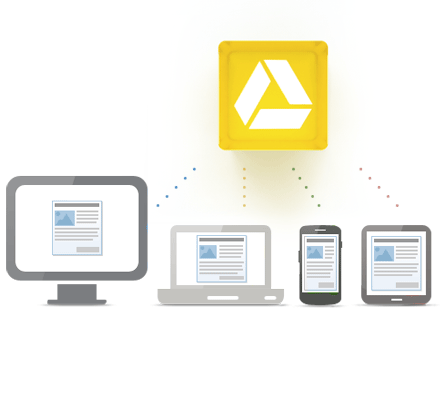
Google Drive is everywhere you are—on the web, in your home, at the office and on the go. So wherever you are, your stuff is just...there. Ready to go, ready to share. Get started with 5 GB free.

Google Drive is available for:
  • PC and Mac
  • iPhone and iPad (coming soon)
  • Android devices
Access everywhere
Store your files in a safe place

Store your files in a
safe place.

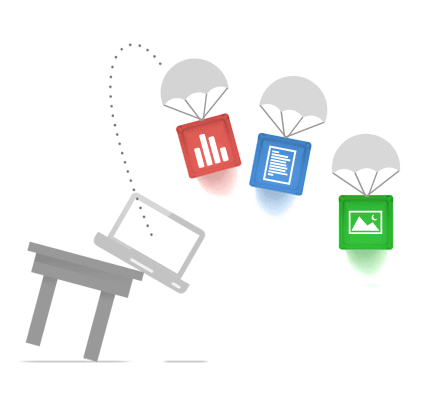
Things happen. Your phone goes for a swim. Your laptop takes an infinite snooze. No matter what happens to your devices, your files are safely stored in Google Drive.

Go beyond storage. Collaborate.

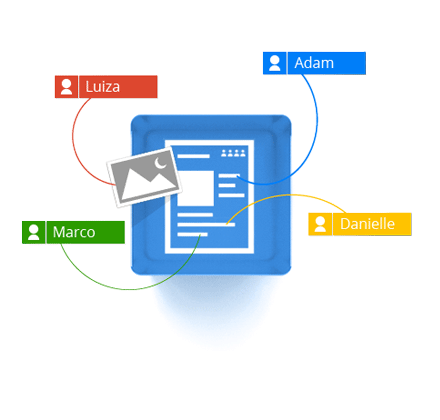
Google Drive lets you do more than just store your files. Share files with exactly who you want and edit them together, from any device.

Google Drive gives you instant access to Google Docs, a suite of editing tools that makes working together better—even when your teammates are miles away.
Collaborate
5 GB Free storageFree

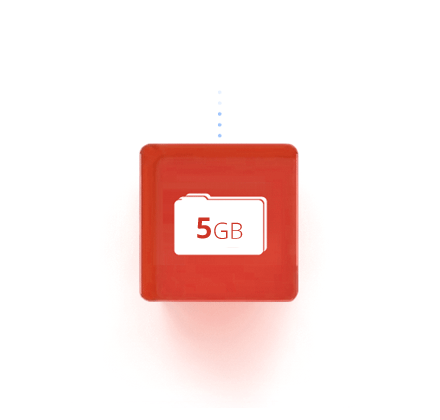
Get 5 GB for free.

Get started with 5 GB of free space. Upgrade to 25 GBfor less than $2.50 a month, and you can store practically everything for next to nothing.

మరింత సమాచారం కోసమ్ ఇక్కడ చూడండి.

వెబ్ సైట్: https://drive.google.com/start 

 ధన్యవాదాలు

Wolfram Education Portal: లెక్కల టీచర్ల కోసం..

ఉపాద్యాయులు మరియు విద్యార్ధులకు ఉపయోగకరమైన ఎడ్యుకేషనల్ టూల్స్ అందిస్తున్న Wolfram , లెక్కల కాన్సెప్ట్స్ సులభంగా  విద్యార్ధులకు అర్ధమయ్యేలా వివరించటం కోసం టీచర్ల కోసం ప్రత్యేకమైన టూల్ ని రూపొందించింది, అదే Wolfram Education Portal ఇక్కడ ప్రధానంగా algebra మరియు calculus పైనే ఫొకస్ చేశారు. సైట్ లో లాగిన్ చెయ్యటానికి Wolfram ఐడీ కోసం టీచర్లు ముందుగా అకౌంట్ క్రియేట్ చేసుకోవాలి. తర్వాత Wolfram CDF Player ని డౌన్లోడ్ చేసుకుని ఇనస్టలేషన్ చేసుకోవాలి. ఈ సైట్ లో eTextbook, lesson plan, demonstration tools మరియు widgets ఉన్నాయి.


వెబ్ సైట్: http://education.wolfram.com/
 ధన్యవాదాలు

కరప్ట్ అయిన Excel ఫైల్ డాటా రికవర్ చెయ్యటానికి!!!

కరప్ట్ అయిన Excel వర్క్ షీట్స్ లోని డాటా రికవర్ చెయ్యటానికి Excel Recovery అనే ఉచిత అప్లికేషన్ ఉపయోగపడుతుంది. మైక్రోసాప్ట్ సూచించిన వివిధ ఎక్సెల్ డాటా రికవరీ పద్ధతులను అనుసరిస్తూ రూపొందించిన ఈ అప్లికేషన్ ని ఉపయోగించి పాడైన ఫైళ్ళను HTML లేదా SYLK ఫార్మేట్లలో ఓపెన్ లేదా సేవ్ చెయ్యటం మొదలగు పధ్ధతతులను ఉపయోగించి డాటా రికవర్ చెయ్యవచ్చు. 


దీనిలోని ఇతర పద్ధతులు :
Opening the corrupt workbook with calculations to manual or in safe mode
Opening in the Excel Viewer or WordPad,
Opening the file in open and repair
Open and extract data modes, and using the external references method.

డౌన్లోడ్: Excel Recovery

ధన్యవాదాలు

Friday, April 13, 2012

మీకు కావలసిన రైలు ఎక్కడ ఉందో తెలుసుకోవటానికి [Spot your train]!

మనం ఎక్కవలసిన లేదా మనం ఎవరినైనా రిసీవ్ చేసుకోవటానికి స్టేషన్ కి వెళ్ళాలంటే కనుక వాళ్ళు వస్తున్న రైలు ఎన్ని గంటలకు వస్తుంది, ఎక్కడ ఉంది, ఎంత లేటు, వాటి రాక/ పోక అనే విషయాలను రైల్వే ఎంక్వరీ  కి ఫోన్ చేసి కనుక్కుంటాం, ఒక్కొక్కసారి ఫోన్ లో చాలా సమయం వేచి ఉండవలసి కూడా వస్తుంది. అలా కాకుండా ఇప్పుడు పైన తెలియచేసిన వివరాలను ఆన్ లైన్ లో కూడా చూడవచ్చు. దాని కోసం భారతీయ రైల్వే నిర్వహిస్తున్న  http://www.trainenquiry.com/o/indexNS.aspx అనే సైట్ ఉపయోగపడుతుంది. అయితే ట్రైన్ నంబరు తెలిసి ఉండాలి. ’Enter Train Number' దగ్గర ట్రైన్ నంబర్ ఎంటర్ చేసి ’Search' పై క్లిక్ చెయ్యాలి. తర్వాత ట్రైన్ పేరు సెలెక్ట్ చేసుకొని ఏ స్టేషన్ వద్ద మీకు దాని రాకపోకలు కావాలో ఆ స్టేషన్ ని సెలెక్ట్ చేసుకొని ఈరోజు ట్రైన్ వివరాల కోసం ’for todays train' దగ్గర ’Go' పై క్లిక్ చెయ్యాలి.  


అయితే పై సైట్ స్ధానం లో  క్రొత్త సైట్ రాబోతుంది, అది బీటా దశలో ఉంది, దానిని ఇక్కడ చూడవచ్చు http://www.trainenquiry.com/. ఇక్కడ సెర్చ్ లో రైలు నంబర్ ఎంటర్ చెయ్యాలి, రైలు వివరాలు వస్తాయి, కావలసిన రోజు పై క్లిక్ చెయ్యాలి.


వెబ్ సైట్: http://www.trainenquiry.com/

ధన్యవాదాలు

Thursday, April 12, 2012

పీడీఎఫ్ ఫైళ్ళను Merge లేదా Split చెయ్యటానికి ఆన్ లైన్ టూల్!!

ఎటువంటి రిజిస్ట్రేషన్ లేదా అప్లికేషన్ ఇనస్టలేషన్ చెయ్యకుండా ILovePDF సైట్ కి వెళ్ళి పీడీఎఫ్ ఫైళ్ళను Merge లేదా Split చెయ్యవచ్చు.  సైట్ కి వెళ్లగానే ఈ క్రింది చిత్రం లో లా కనిపిస్తుంది.


ఫీడీఎఫ్ ఫైళ్ళను మెర్జ్ చెయ్యటానికి ’Merge PDF files' పై క్లిక్ చెయ్యాలి, తర్వాత ’ Select PDF Files' పై క్లిక్ చేసి మెర్జ్ చెయ్యవలసిన ఫైళ్ళను సెలెక్ట్ చేసుకోవాలి. 

ఫైళ్ళను ఎంచుకున్న తర్వాత ’ Merge PDFs' పై క్లిక్ చెయ్యాలి. ఫైళ్ళు ఒక్కొక్కటిగా జత చెయ్యబడిన తర్వాత డౌన్లోడ్ కి సిద్ధమవుతుంది, Download లింక్ పై క్లిక్ చేసి మెర్జ్ చెయ్యబడిన ఫైల్ డౌన్లోడ్ చేసుకోవచ్చు.

అలాగే పెద్ద ఫైల్ ని చిన్న చిన్న ఫైల్స్ గా స్ప్లిట్ చెయ్యటానికి  'Split PDF'  పై క్లిక్ చెయ్యాలి (మొదటి చిత్రం చూడండి).

అయితే మెర్జ్ లేదా స్ప్లిట్ చెయ్యటానికి కొన్ని పరిధులు ఉన్నాయి వాటిని ఇక్కడ చూడండి:


వెబ్ సైట్: ILovePDF

ధన్యవాదాలు

Wednesday, April 11, 2012

మీ పీసీ స్క్రీన్ ని వేరొక పీసీ లేదా ఇతర డివైజెస్ తో షేర్ చేసుకోవటానికి!!!

మన పీసీ ట్రబుల్ షూటింగ్ కోసమో లేదా మరి ఏయితర అవసరాల కోసమో మన డెస్క్  టాప్ ని ఇతరులతో షేర్ చేస్తూ ఉంటాం. డెస్క్ట్ టాప్ షేరింగ్ సంబంధించిన అప్లికేషన్లు మరియు బ్రౌజర్ యాడ్-ఆన్ ల గురించి ఇంతకు ముందు చాలా పోస్ట్ లలో చుశాం. ఇక్కడ మరొక వెబ్ ఆధారిత డెస్క్ టాప్ షేరింగ్ గురించి చెప్పబోతున్నాను అదే screenleap దీనిని ఉపయోగించి మన డెస్క్ టాప్ ని వేరొక పీసీ లేదా టాబ్లెట్ లేదా స్మార్ట్ ఫోన్ తో షేర్ చేసుకోవచ్చు. 

దీనిని ఎలా ఉపయోగించాలో చూద్దాం:

౧. ముందుగా  screenleap సైట్ కి వెళ్ళి ’Share your Screen Now' పై క్లిక్ చెయ్యాలి.

౨. జావా ప్లగిన్ పర్మిషన్ కోసం "Always run on this site". పై క్లిక్ చెయ్యాలి
౩. తర్వాత ఈ క్రింద చిత్రంలో చూపిన విధంగా విండో వస్తుంది, అక్కడ check the box దగ్గర టిక్ పెట్టి, "Run" ప్రెస్ చెయ్యాలి.

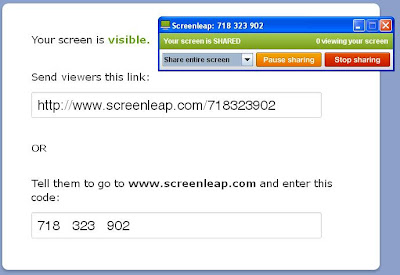
౪. ఇప్పుడు క్రింద చిత్రంలో చూపిన విధంగా URL వస్తుంది దానిని ఎవరితో అయితే మన స్క్రీన్ షేర్ చెయ్యాలనుకుంటున్నామో వారికి ఇవ్వాలి. అవతలి వారు ఆలింక్ ని ఉపయోగించి వెబ్ బ్రౌజర్ లో మన డెస్క్టాప్ చూడగలరు. అలాగే ఒక కంట్రోల్ బాక్స్ కూడా వస్తుంది దానిని ఉపయోగించి మొత్తం స్క్రీన్ లేదా ఎంచుకున్న భాగాన్ని షేర్ చెయ్యవచ్చు మరియు షేరింగ్ ’Pause' లేదా 'Stop' కూడా చెయ్యవచ్చు.


చూశారా ఒక చిన్న జావా ప్లగిన్ తప్పించి ఎటువంటి అప్లికేషన్ ఇనస్టలేషన్ చెయ్యకుండా మరియు ఎటువంటి రిజిస్ట్రేషన్ లేకుండా ఎంత సులభంగా డెస్క్ టాప్ షేర్ చేశామో!!!

వెబ్ సైట్: screenleap

ధన్యవాదాలు

Friday, April 6, 2012

వీడియో ఫైళ్ళ నుండి ఆడియో సెపరేట్ చెయ్యటం ఎలా ?

నచ్చిన వీడియోల నుండి ఆడియో ట్రాక్ సెపరేట్ చెయ్యటానికి Audacity అనే ఉచిత ఆడియో రికార్డింగ్ మరియు ఎడిటింగ్ సాప్ట్ వేర్ ని ఉపయోగపడుతుంది. పీసీ నే సోర్స్ గా ప్లే అవుతున్న వీడియో యొక్క ఆడియోని రికార్డ్ చెయ్యవచ్చు. 


ఇదంతా ఎందుకు అనుకుంటే సింపుల్  ఉచిత వీడియో టు ఎంపీ 3 కన్వర్టర్ ని కుడా ఉపయోగించవచ్చు. Free Video to MP3 Converter ని ఎలా ఉపయోగించాలో స్టెప్ బై స్టెప్ ఇక్కడ చూడండి. 


Step 1. Download Free Video to MP3 Converter

This is a clearly free program. There is no spyware or adware. It's absolutely safe to install and to run!

Step 2. Launch Free Video to MP3 Converter

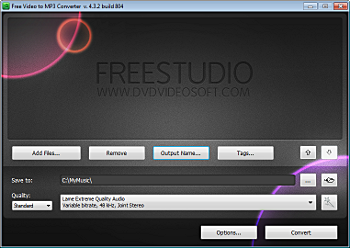
Free Video to MP3 Converter: launch the program
Follow Start > All Programs > DVDVideoSoft > Programs > Free Video to MP3 Converter or just click the DVDVideoSoft Free Studio icon on the desktop.
The interface is very simple and self explaining. There is a field for input files, a field for an output path, and the list with preconfigured profiles. If you want to change default theme, go to Options → Theme.

Step 3. Select Input Video Files

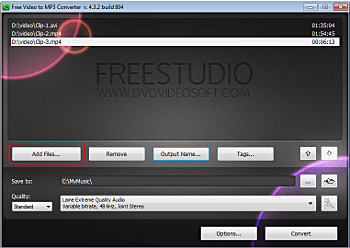
Free Video to MP3 Converter: select input video file
Click the the Add files... button to select an input video file(s) from your computer.
Input file formats: *.avi; *.ivf; *.div; *.divx; *.mpg; *.mpeg; *.mpe; *.mp4; *.m4v; *.webm; *.wmv; *.asf; *.mov; *.qt; *.mts; *.m2t; *.m2ts; *.mod; *.tod; *.vro; *.dat; *.3gp2; *.3gpp; *.3gp; *.3g2; *.dvr-ms; *.flv; *.f4v; *.amv; *.rm; *.rmm; *.rv; *.rmvb; *.ogv; *.mkv; *.ts.
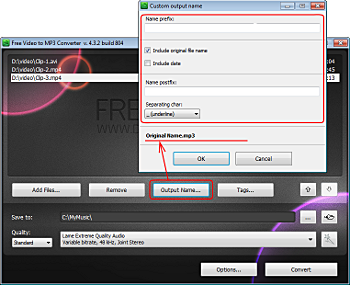
Free Video to MP3 Converter: set output file name
By default the output file name is the same as video title is. If you want to change it click the Output Name... button. A new window will be opened.
There are some parameters in it (Name Prefix, Postfix and others) which you can set as you like.
In the bottom of this window you can see the pattern of the output file name. It's formed according to the current options.
Note: the pattern is the same for all output files during one session, it's not allowed to set the unique pattern for each file.

Step 4. Select Output Location

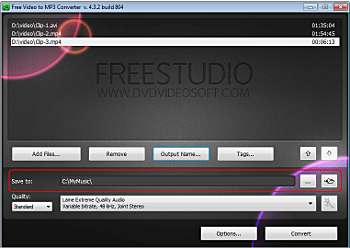
Free Video to MP3 Converter: select output location
Click the Browse... button and choose the location where you would like to save your converted video files. Click Ok.
If you want to access the output folder content, click Open.

Step 6. Set Tags

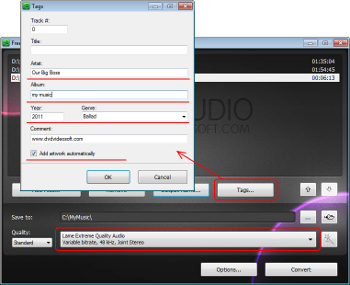
Free Video to MP3 Converter: set tags
Click the Tags... button to set tags for the output MP3 file(s).
By default the program will automatically fill the title tag and the artwork, taking a snapshot from the middle of video which can be seen in iTunes, Winamp, Windows Explorer.
Click OK to switch back to the main program window.

Step 5. Select Presets

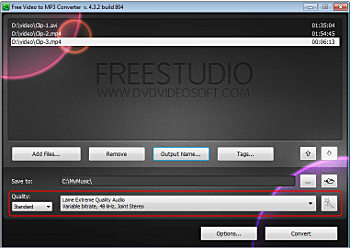
Free Video to MP3 Converter: select presets
Select the Quality of the output file: high, standard or economic.
Then choose one of the pre-configured presets from the drop-down list according to the selected quality.
For advanced users: read this guide to find information about how to customize a preset or create a new one.

Step 7. Extract Audio from Video to MP3

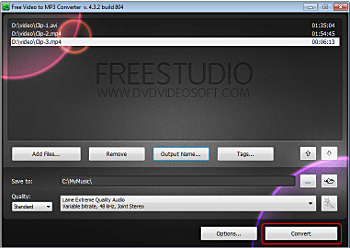
Free Video to MP3 Converter: extract audio from video to mp3
Click the Convert button along the bottom of the interface to convert video to mp3 and wait just a few seconds.
Note: Before clicking the Convert button you can set to turn off computer after the process is completed. Just go to Options... and make sure the appropriate box is checked.


ధన్యవాదాలు