Thursday, July 31, 2008

ఫన్ విత్ విండోస్ ఎక్స్పీ

ఇక్కడ చెప్పిన సంగతులు మీకు అల్రెడీ తెలిసి వుంటే ప్లీజ్ ఇగ్నోర్ చెయ్యండి.
1.XP మాట్లాడుతుంది:

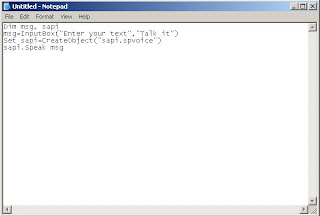
ఒక నోట్ పాడ్ ఓపెన్ చేసి ఈ క్రింద యివ్వబడిన కోడ్ ని కాపీ చేసి దానిలో పేస్ట్ చేసి .vbs ఎక్స్ టెన్షన్ తో సేవ్ చెయ్యాలి. ఆ ఫైల్ VB Script file గా మారుతుంది.

Dim msg, sapi
msg=InputBox("Enter your text","Talk it")
Set sapi=CreateObject("sapi.spvoice")
sapi.Speak msg


ఇప్పుడు సేవ్ చేసిన ఫైల్ పై మౌస్ తో డబుల్ క్లిక్ చేస్తే వచ్చే విండో లో టెక్స్ట్ టైప్ చేసి 'OK' బటన్ ప్రెస్ చెయ్యాలి.


2.Starwars Movie చూడాలా?

XP లో ASCII Starwars Movie దాగి వుంది. దానిని చూడాలంటే Start ---> Run కి వెళ్ళి ఈ కమాండ్ telnet towel.blinkenlights.nl టైప్ చేసి ’OK' బటన్ క్లిక్ చెయ్యాలి.


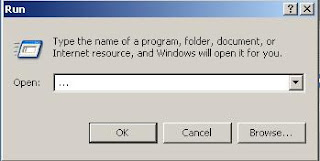
ఒక చిన్న చిట్కా: ’My Computer' త్వరగా ఓపెన్ అవటానికి Start ---> Run కి వెళ్ళి ఈ కమాండ్ ... (3 dots) టైప్ చేసి ’OK' బటన్ క్లిక్ చెయ్యాలి.

Wednesday, July 30, 2008

Word, Excel 2007 కీబోర్డ్ షార్ట్ కట్స్

Word 2007 Function Key Shortcuts:

[F1] – Invoke Help System
[Shift]+[F1] – Context-sensitive help or reveal formatting
[Alt]+[F1] – Next Field
[Shift]+[Alt]+[F1] – Previous Field
[Ctrl]+[Shift]+[F1] – Display Microsoft System information

[F2] – Move Selection
[Shift]+[F2] – Copy Selection
[Ctrl]+[F2] – Print Preview
[Shift]+[Alt]+[F2] – Save
[Ctrl]+[Alt]+[F2] –Open

[Shift]+[F3] – Change case of selection
[Ctrl]+[F3] – Cut Selection to the Spike
[Alt]+[F3] – Create a building block entry
[Shift]+[Ctrl]+[F3] – Paste information from the spike

[F4] – Repeat last Action
[Shift]+[F4] – Repeat last find or GOTO Operation
[Ctrl]+[F4] – Close Window
[Alt]+[F4] – Quit
[Shift]+[Alt]+[F4] – Quit

[F5]- GoTo
[Shift]+[F5] –Return to last edit location
[Alt]+[F5] - Restore Program Window Size
[Shift]+[Ctrl]+[F5] – Edit bookmark

[F6] – Next Pane
[Shift]+[F6] – Previous Pane
[Ctrl]+[F6] – Next Window
[Alt]+[F6] – Switch between dialog box and document
[Shift]+[Ctrl]+[F6] – Previous window
[Shift]+[Alt]+[F6] – Previous window

[F7] – Spell Check
[Shift]+[F7] - Thesaurus
[Alt]+[F7] – Select next spelling error and display context menu
[Shift]+[Ctrl]+[F7] – Update links
[Shift]+[Alt]+[F7] – Display Research task pane

[F8] – Extend Selection
[Shift]+[F8] – Collapse Selection
[Alt]+[F8] – Display Macros dialog box
[Shift]+[Ctrl]+[F8] –Start COL selection mode

[F9] – Update fields
[Shift]+[F9] – Toggle display of field code or results
[Ctrl]+[F9] – Insert field code braces
[Alt]+[F9] – Toggle display of all field codes or results
[Shift]+[Ctrl]+[F9] – Convert field to regular text
[Shift]+[Alt]+[F9] – Run GOTOBUTTON or MACROBUTTON from a field

[F10] – Show Key tips
[Shift]+[F10] – Display Context Menu
[Ctrl]+[F10] – Maximize Document window
[Alt]+[F10] – Maximize program window
[Shift]+[Alt]+[F10] –Control Smart tags

[F11] – Next Field
[Shift]+[F11] – Previous Field
[Ctrl]+[F11] – Lock a field
[Alt]+[F11] – Display VBA editor
[Shift]+[Ctrl]+[F11] – Unlock a filed

[F12] – Save As
[Shift]+[F12] – Save
[Ctrl]+[F12] – Open
[Shift]+[Ctrl]+[F12] – Print


Excel 2007 Shortcuts:

[Crtl]+[Shift]+[(] – Unhides any hidden row within the selection
[Crtl]+[Shift]+[)] - Unhides any hidden column within the selection
[Crtl]+[Shift]+[&] – Applies the outline border to the selected cells
[Crtl]+[Shift]+[-] – Removes the outline border from the selected cells
[Crtl]+[Shift]+[$] – Applies the currency format with two decimal places
[Crtl]+[Shift]+[%] – Applies the percentage format with no decimal places
[Crtl]+[Shift]+[^] – Applies the Exponential number format with two decimal places
[Crtl]+[Shift]+[#] – Applies the Date format with the day, Month and Year
[Crtl]+[Shift]+[@] – Applies the Time format with the Hour and Minute and AM or PM
[Crtl]+[Shift]+[!] – Applies the Number format with two decimal places, thousand separator and minus sign (-) for negative values
[Crtl]+[Shift]+[*] – Selects the current region around the active cell
[Crtl]+[Shift]+[:] – Enters the current time
[Crtl]+[Shift]+[“] – Copies the value from the cell above the active cell into the cell or the formula bar
[Crtl]+[Shift]+[+] – Display the insert dialog box to insert blank cells
[Ctrl]+[-] – Displays the delete dialog box to delete the selected cells
[Ctrl]+[;] –Enters the current Date
[Ctrl]+[`] –Alternates between displaying cell values and displaying formulas in the worksheet
[Ctrl]+[‘] – Copies the value from the cell above the active cell into the cell or the formula bar
[Ctrl]+[1] –Displays the format cells dialog box
[Ctrl]+[2] – Applies or removes the bold formatting
[Ctrl]+[3] – Applies or removes the italic formatting
[Ctrl]+[4] –Applies or removing underlining
[Ctrl]+[5] –Applies or removes strikethrough
[Ctrl]+[6] – Alternates between hiding objects, displaying objects and displaying plave holders for objects
[Ctrl]+[8] –Displays or hides the outline symbol
[Ctrl]+[9] –Hides the selected rows
[Ctrl]+[0] –hides the selected columns
[Ctrl]+[A] –Selects the entire worksheet
[Ctrl]+[B] –Applies or removes bold formatting
[Ctrl]+[C] –Copies the selected cells
[Ctrl]+[D] –Uses the file down command to copy the contents and format of the topmost cell of a selected range into the cells bellow
[Ctrl]+[F] –Displays the find and replace dialog box, with the find tab selected
[Ctrl]+[G] –Displays the GOTO dialog box
[Ctrl]+[H] –Displays the find and replace dialog box, with the replace tab selected
[Ctrl]+[I] –Applies or removes italic formatting
[Ctrl]+[K] –Displays the insert Hyperlink dialog box for new hyperlinks or the edit hyperlink dialog box for selected existing hyperlinks
[Ctrl]+[N] –Creates a new, blank workbook
[Ctrl]+[O] –Displays the open dialog box to open or find files
[Ctrl]+[P] –Displays the print dialog box
[Ctrl]+[S] –Saves the active file
[Ctrl]+[U] – Applies or removes underlining
[Ctrl]+[W] –Closes the selected workbook window
[Ctrl]+[X] –Cuts the selected cells
[Ctrl]+[Y] –Repeats the last command or action
[Ctrl]+[Z] –uses the Undo command to reverse the last command or to delete the last entry
Tuesday, July 29, 2008

USB Drive పనితనాన్ని మెరుగుపర్చటం ఎలా?

USB Drive పనితనాన్ని మెరుగుపర్చటానికి ఈ విధంగా చెయ్యండి. ముందుగా USB Drive ని ప్లగ్ ఇన్ చెయ్యాలి, ’My Computer' ఓపెన్ చేసి, USB Drive పై మౌస్ రైట్ క్లిక్ చేసి ’Properties' సెలెక్ట్ చేసుకోవాలి. ’Properties' లోని ’Hardware' టాబ్ లో USB Drive ని సెలెక్ట్ చేసుకొని, క్రిందవున్న ’Properties' బటన్ పై క్లిక్ చెయ్యాలి. ఇప్పుడు ఓపెన్ అయిన విండోలో ’Policies' టాబ్ లో ’Optimize for Performance' అనే ఆప్షన్ ను సెలెక్ట్ చేసుకొని ’OK' బటన్ పై క్లిక్ చెయ్యాలి. USB Drive ని తొలగించి మరల ఇన్సర్ట్ చెయ్యాలి. ఇప్పుడు ఏదైనా ఫైల్ ని USB Drive లోకి కాపీ చెయ్యండి, కాపీ అవటానికి పట్టే సమయం తగ్గటం మీరు గమనిస్తారు.


ధన్యవాదాలు

Monday, July 28, 2008

ఫైర్ ఫాక్స్ కీబోర్డ్ షార్ట్ కట్లు

Navigation:
Back - [Alt]+Left Arrow లేదా [Backspace]
Forward - [Alt]+Right Arrow లేదా [Shift]+[Backspace]
Home – [Alt]+[Home]
Open File – [Ctrl]+[O]
Reload – [F5] or [Ctrl]+[R]
Reload(Override cache) – [Ctrl]+[F5] లేదా [Ctrl]+[Shift]+[R]
Stop - [Esc]

Search:

Find – [Ctrl]+[F]
Find Again – [F3] లేదా [Crtl]+[G]
Find as you type link – [‘]
Find as you type text - [/]
Find Previous - [Shift]+[F3]
Web search - [Ctrl]+[K] లేదా [Ctrl]+[E]

Windows and Tabs:
Close Tab – [Ctrl]+[W] లేదా [Ctrl]+[F4]
Close Window - [Ctrl]+[Shift]+[W] లేదా [Alt]+[F4]
Move Current Tab left – [Ctrl]+Left Arrow లేదా [Ctrl]+Up arrow
Move Current Tab right – [Ctrl]+Right Arrow లేదా [Ctrl]+Down arrow
Move Current tab to beginning – [Ctrl]+[Home]
Move Current tab to end – [Ctrl]+[End]
New Tab – [Ctrl]+[T]
New Window – [Ctrl]+[N]
Next Tab – [Ctrl]+[Tab] లేదా [Ctrl]+[Page Down]
Open Address in New tab (From location or search Bar) – [Alt]+[Enter]
Previous Tab – [Ctrl]+[Shift]+[Tab] లేదా [Ctrl]+[Page Up]
Undo close tab – [Ctrl]+[Shift]+[T]
Select Tab (1 to 8) – [Ctrl]+[1] to [8]
Select last Tab – [Ctrl]+[9]

Miscellaneous:
Complete .com address – [Ctrl]+[Enter]
Complete .net address – [Shift]+[Enter]
Complete .org address – [Ctrl]+[Shift]+[Enter]
Delete auto complete Entry - [Delete]
Full screen – [F11]
Select Location Bar – [Alt]+[D] లేదా [Ctrl]+[L]
Select search Engines (When search bar is focused) – [Alt]+Up Arrow or [Alt]+Down Arrow లేదా [F4]

Friday, July 25, 2008

యూట్యూబ్ నుండి వీడియో డౌన్ లోడ్ చెయ్యటం ఎలా?

నెట్ లో వీడియోలు చూడాలంటే అందరూ ఎక్కువగా చూసే సైట్ యూట్యూబ్ (www.youtube.com), దీట్లోంచి వీడియోలు క్యాప్చర్ చెయ్యటానికి చాలా పధ్దతులు వున్నాయి. ఇక్కడ యూట్యూబ్ నుండి వీడియోలు డౌన్ లోడ్ చెయ్యటానికి సులువైన పధ్ధతిని వివరిస్తున్నాను.
1.ముందుగా యూట్యూబ్ (www.youtube.com)వెళ్ళి, కావలసిన వీడియోను ఎంపిక చేసుకొని క్లిక్ చెయ్యాలి

2.వీడియో ఓపెన్ అయిన తర్వాత వెబ్ పేజ్ అడ్రస్ లింకు ని సెలెక్ట్ చేసుకొని కాపీ ([Ctrl]+[c]) చేసుకోవాలి

3.ఇప్పుడు http://viddownloader.com/ అనే సైట్ కి వెళ్ళాలి

4.ఇప్పుడు viddownloader లో "Copy the link of the page with the video and paste it here" దగ్గర ఇందాక యూట్యూబ్ లో కాపీ చేసిన వీడియో లింకును paste ([Ctrl]+[v]) చెయ్యాలి. తర్వాత ’GET VIDEO' బటన్ పైక్లిక్ చెయ్యాలి.

5.’DOWNLOAD FILE' పై క్లిక్ చెయ్యాలి.

6.ఫైల్ డౌన్లోడ్ విండో ఓపెన్ అవుతుంది, కావలసిన లొకేషన్ లో దానిని సేవ్ చేసుకోవచ్చు


7.'get_video' అనే పేరుతో సేవ్ చెయ్యబడిన ఫైల్ ని మనకు నచ్చిన పేరుతో రీనేమ్ (Rename) చేసి చివరన .flv అనే ఎక్స్ టెన్షన్ ఇవ్వాలి.(ఉదా:myvideo.flv). మీ సిస్టం లో FLV Player వుంటే డౌన్ లోడ్ చేసిన వీడియోను దానిలో ప్లే చేసుకోవచ్చు. లేకుంటే FLV Player ను http://www.download.com/FLV-Player/3000-2139_4-10467081.html?hhTest=1 నుండి డౌన్ లోడ్ చేసుకోవచ్చు.


ధన్యవాదాలు

Wednesday, July 23, 2008

వెబ్ సైట్లను బ్లాక్ చెయ్యటం ఎలా?

మనం ఒక్కొక్కసారి కొన్ని వెబ్ సైట్లు మనం సిస్టంలో ఓపెన్ కాకూడదు అని అనుకొంటాం. నిర్దిస్టమైన వెబ్ సైట్లు ఓపెన్ కాకుండా ఏం చెయ్యాలో యిక్కడ వివరిస్తున్నాను. ముందుగా హార్డ్ డిస్క్ లోని 'Windows' ఫోల్డర్ లోని 'System32' --->'Drivers'---->'etc' ఫోల్డర్ లోని ’hosts' అనే ఫైల్ ని Notepad లో ఓపెన్ చెయ్యాలి.

ఇక్కడ ఉదాహరణ కు www.abc.com అనే సైట్ బ్లాక్ చెయ్యాలంటే ...Notepad లో ’Hosts' ఫైల్ ఓపెన్ అయిన తర్వాత చివరన 127.0.0.1 www.abc.com అని టైప్ చేసి, మెయిన్ మెనూ లోని ’File' కి వెళ్ళి ’Save' చేసి ఫైల్ ’Close' చెయ్యాలి. అంతే www.abc.com అనే సైట్ యిక ఏ బ్రౌజర్ లోనూ ఓపెన్ కాదు.


ధన్యవాదాలు

Tuesday, July 22, 2008

అప్ డేట్ చెకర్ - మీ సాప్ట్ వేర్ల అప్ డేట్లు చెక్ చేసుకోవటానికి!!

అప్ డేట్ చెకర్ - ఇది ఒక చిన్న యుటిలిటీ, దీనిని వుపయోగించి మన సిస్టం లో వున్న ఏయే సాప్ట్ వేర్ల కు అప్ డేట్లు అవసరం అవుతాయో తెలుసుకోవచ్చు. ఈ యుటిలిటీ ని http://www.filehippo.com/updatechecker/ నుండి డౌన్ లోడ్ చేసుకోవచ్చు, ఇది ఫ్రీవేర్ మరియు డౌన్ లోడ్ సైజ్ 148 KB. ముందుగా అప్ డేట్ చెకర్ ను డౌన్ లోడ్ చేసి, ఇనస్టలేషన్ చెయ్యాలి. తర్వాత డెస్క్ టాప్ పై క్రియేట్ చెయ్యబడిన ’Update Checker' ఐకాన్ పై మౌస్ డబుల్ క్లిక్ చెయ్యాలి. ఇది సిస్టం ను పూర్తిగా స్కాన్ చేసి ఇనస్టలేషన్ చెయ్యబడిన సాప్ట్ వేర్లు మరియు వాటి వెర్షన్లను చెక్ చేసి, అప్ డేట్స్ అవసరమైన సాప్ట్ వేర్ల లిస్ట్ ను Filehippo.com కి పంపుతుంది. అంటే అప్ డేట్ చేసుకోవలసిన లిస్ట్ మన బ్రౌజర్ లో ఓపెన్ అవుతుంది. దీని కోసం సిస్టం నెట్ కి తప్పనిసరిగా కనెక్ట్ అయ్యివుండాలి.

నా సిస్టం ను నేను చెక్ చేసినప్పుడు ఈ క్రిందివాటిని అప్ డేట్ చేసుకోవాలని చూపించింది.


ఫైన్ చూపబడిన లిస్ట్ లో అవసరమైన దాని పై క్లిక్ చేసి అప్ డేట్ చేసుకోవచ్చు.

అప్ డేట్ చెకర్ విండోస్ విస్టా, ఎక్స్పీ, 2003, 2000, ME,98 లలో పనిచేస్తుంది. ఇది పనిచెయ్యాలంటే మైక్రోసాప్ట్ .నెట్ ఫ్రేమ్వర్క్ అవసరం.

ధన్యవాదాలు

Friday, July 18, 2008

Power Defragmenter - డీఫ్రాగ్ మెంట్ టూల్

హార్డ్ డిస్క్ లోని ఫైల్ సిస్టం లో చెల్లచెదురుగా వున్న ఫైళ్ళను ఒక దగ్గరకు చేర్చి,వరుస క్రమంలో పెట్టటానికి డీఫ్రాగ్ మెంటేషన్ వుపయోగపడుతుంది. దీనివలన హార్డ్ డిస్క్ లో ఫైల్స్ ఒకదగ్గరికి, ఖాళీ ప్రదేశం ఒకదగ్గరకు వస్తాయి. దీనితో హార్డ్ డిస్క్ లో ఒక ఫైల్ సేవ్ చెయ్యటానికి లేదా రిట్రీవ్ చెయ్యటానికి పట్టే సమయం బాగా తగ్గుతుంది. సాధారణంగా హార్డ్ డిస్క్ ప్రోపర్టీస్ లో లభించే డీఫ్రాగ్ మెంటేషన్ టూల్ ని వుపయోగిస్తాం, ఇది చాలా ఎక్కువ సమయం పడుతుంది. దీనికన్నా పదిరెట్లు వేగంగా పనిచేసే డీఫ్రాగ్ మెంట్ టూల్ ఒకటి వుంది అదే Power Defragmenter 2.0.125, దీనిని http://www.softpedia.com/progDownload/Power-Defragmenter-Download-20185.html నుండి డౌన్ లోడ్ చేసుకోవచ్చు. ఇది జిప్ ఫైల్ మరియు సైజ్ 473KB వుంటుంది. డౌన్లోడ్ అయిన ఫైల్ ని అన్ జిప్ చేసి Power Defragmenter GUI అనే ఫైల్ పై డబుల్ క్లిక్ చెయ్యాలి. ఈ క్రింది విండో ఓపెన్ అవుతుంది.

’Next'బటన్ క్లిక్ చేస్తే నాలుగు ఆప్షన్లు వస్తాయి, హార్డ్ డిస్క్ మొత్తం డీఫ్రాగ్ మెంట్ చెయ్యాలంటే ’Defragment Disk' ఆప్షన్ సెలెక్ట్ చేసుకోవాలి.

’Next'బటన్ క్లిక్ చేసి, డీఫ్రాగ్ మెంట్ చెయ్యవల్సిన డ్రైవ్ సెలెక్ట్ చేసి , ’Defragment'బటన్ క్లిక్ చెయ్యాలి


Wednesday, July 16, 2008

విండోస్ XP,2000 లేదా 2003 ఇనస్టలేషన్ తో పాటు సర్వీస్ ప్యాక్ లు, డ్రైవర్లు మరియి యితర సాప్ట్ వేర్ లు ఆటోమాటిక్ గా ఇనస్టలేషన్ చేయటం ఎలా?


విండోస్ XP,2000 లేదా 2003 ఇనస్టలేషన్ తో పాటు సర్వీస్ ప్యాక్ లు, డ్రైవర్లు, హాట్ ఫిక్స్ లు, యాడ్-ఆన్ లు, అప్ డేట్ లు మరియి యితర సాప్ట్ వేర్ లు ఆటోమాటిక్ గా ఇనస్టలేషన్ చేయటానికి Nlite సాప్ట్ వేర్ వుపయోగపడుతుంది. దీనిని http://www.nliteos.com/download.html నుండి డౌన్ లోడ్ చేసుకోవచ్చు. ఇది ఫ్రీవేర్ మరియు డౌన్ లోడ్ ఫైల్ సైజ్ 2.52 MB మాత్రమే. Nlite ని వుపయోగించి విండోస్ ఇనస్టలేషన్ కు పైన చెప్పిన సాప్ట్ వేర్ లు జోడించి ISO image లేదా డైరెక్ట్ గా ఇనస్టలేషన్ CD తయారుచేసుకోవచ్చు. Nlite ని వుపయోగించే విధానాన్ని http://www.nliteos.com/guide/ ఈ లింకు లో స్టెప్ వైజ్ చాలా చక్కగా వివరించారు.

అయినా మీ కోసం నేను XP తో ట్రై చేసిన విధానాన్ని వివరిస్తున్నాను:

1. Nlite ని ఇనస్టలేషన్ చేసిన తర్వాత Start---> All programs---> Nlite---> Nlite ని ఓపెన్ చెయ్యండి


డీఫాల్ట్ లాంగ్వేజ్ ఇంగ్లీష్ సెలెక్ట్ అవుతుంది... ’Next' బటన్ క్లిక్ చెయ్యాలి

2. XP ఇనస్టలేషన్ వున్న ఫోల్డర్ ని ’Browse' బటన్ ద్వారా సెలెక్ట్ చెయ్యాలి. మనం జోడించవలసిన సాప్ట్ వేర్లు అన్ని హార్డ్ డిస్క్ లోనే వుంటే మంచిది. ఫోల్డర్ సెలెక్ట్ చేసిన తర్వాత ’Next' బటన్ క్లిక్ చెయ్యాలి


3.ప్రిసెట్ లు ఇంపోర్ట్ చెయ్యలంటే ’Import' బటన్ క్లిక్ చెయ్యాలి లేకుంటే ’Next' బటన్ క్లిక్ చెయ్యాలి


4. ఇక్కడ టాస్క్ సెలెక్ట్ చేసుకోవాలి...'All' బటన్ క్లిక్ చేస్తే అన్నీ సెలెక్ట్ అవుతాయి...’Next' బటన్ క్లిక్ చెయ్యాలి


5.సర్వీస్ ప్యాక్ ఏమైనా యాడ్ చెయ్యాలంటే దానిని సెలెక్ట్ చేసుకోవాలి. అది విండోస్ ఇనస్టలేషన్ తో ఇంటిగ్రేట్ చెయ్యబడిన తర్వాత ’Next' బటన్ క్లిక్ చెయ్యాలి


6. ఇక్కడ హాట్ ఫిక్స్ లు, యాడ్ ఆన్ లు, అప్ డేట్ లు ఏమైనా వుంటే ’Insert' బటన్ ద్వారా యాడ్ చెయ్యాలి లేకుంటే ’Next' బటన్ క్లిక్ చెయ్యాలి


7.ఇక్కడ సిస్టం డ్రైవర్లు ’Insert' బటన్ ద్వారా యాడ్ చెయ్యాలి తర్వాత ’Next' బటన్ క్లిక్ చెయ్యాలి


8.ఇక్కడ మనకు అవసరం లేని కాంపోనెంటు లను తొలగించవచ్చు లేకుంటే ’Next' బటన్ క్లిక్ చెయ్యాలి


9.ఇక్కడ నెట్ వర్క్ సెట్టింగులు, యూజర్ ఎకౌంటులు, రీజినల్ సెట్టింగులు, డిస్ప్లే మరియు యితర సెట్టింగులు సెట్ చేసుకోవచ్చు తర్వాత ’Next' బటన్ క్లిక్ చెయ్యాలి


10.ఇక్కడ ప్యాచ్ లు మార్చు కోవాలంటే మార్చుకోవచ్చు లేకుంటే ’Next' బటన్ క్లిక్ చెయ్యాలి


11.ఇక్కడ ట్వీక్ లు సెట్ చేసుకోవాలంటే సెట్ చేసుకోవాలి లేకుంటే ’Next' బటన్ క్లిక్ చెయ్యాలి


12.ఇక్కడ ’Yes' బటన్ క్లిక్ చేసి తర్వాత ’Next' బటన్ క్లిక్ చెయ్యాలి


13.ఇక్కడ Bootale ISO క్రియేట్ చేసుకోవచ్చు, డైరెక్ట్ గా CD బర్న్ లేదా ISO Image సిస్టం లో సేవ్ చేసుకోవచ్చు.


నాకు సాధ్యమైనంత వరకు మీకు అర్ధమయ్యేలా చెప్పటానికి ప్రయత్నించాను ... ఒకవేళ అర్ధం కాకుంటే సైట్ లో ఎలానూ గైడ్ దొరుకుతుంది. ఇంక ఆలస్యం దేనికి దీనిని మీరు కూడా ప్రయత్నించండి.

ధన్యవాదాలు

Monday, July 14, 2008

CDBurnerXP - సిడి / డివిడి బర్నింగ్ సాప్ట్ వేర్


సిడి / డివిడి లు బర్న్ చెయ్యటానికి సిడి /డివిడి రైటర్ లు కొన్నప్పుడు వాటితోపాటు వచ్చే Nero నే మనం సాధారణంగా వుపయోగిస్తూవుంటాం, Nero కి ప్రత్యామ్నాయాన్ని వూహించలేం. Nero లోని అన్ని ఫీచర్లు కలిగి వుండి సిడి ల నుండి బ్లూ రే డిస్కుల వరకు (బ్లూ రే డిస్కులు రైట్ చెయ్యటానికి బ్లూ రే రైటర్ వుండాలి)డాటా బర్న్ చెయ్యటానికి, ISO ఇమేజ్ లు, ఆడియో సిడిలు క్రియేట్ చెయ్యటానికే కాకుండా ఇంకా ఎన్నో ప్రత్యేకతలు కలిగి యున్నదే "CD Burner XP" సాప్ట్ వేర్. దీనిని వుచితంగా http://cdburnerxp.se/ నుండి డౌన్ లోడ్ చేసుకోవచ్చు. డౌన్లోడ్ సైజ్ 2.82 MB. "CD Burner XP" సాప్ట్ వేర్ ని ఇనస్టలేషన్ చెయ్యాలంటే మన సిస్టమ్ లో Microsoft.Net Framework వుండాలి. డ్రాగ్ అండ్ డ్రాప్ పధ్ధతిలో బర్న్ చెయ్యవలసిన ఫైల్స్ లేదా ఫోల్డర్ లను యాడ్ చేసుకోవచ్చు.


Key Features:

1.burn all kinds of discs
2.audio-CDs with or without gaps between tracks
3.burn and create ISO files
4.data verification after burning process
5.create bootable discs
6.multi-language interface
7.bin/nrg → ISO converter, simple cover printing and much more!
8.Operating Systems: Windows 2000/XP/2003 Server/Vista

ధన్యవాదాలు

Friday, July 11, 2008

సైబరాబాద్ మెట్రోపాలిటన్ పోలీస్ వెబ్ సైట్


సైబరాబాద్ మెట్రోపాలిటన్ పోలీస్ ప్రజా సమస్యల పరిష్కారానికి మరియు సమాచారదర్శినిగా ఒక వెబ్ సైట్ http://cyberabadpolice.gov.in/ ను ఇటీవల ప్రారంభించారు। ఈ సైట్ ద్వారా సంబంధిత పోలీస్ స్టేషన్ల లో పనిచేస్తున్న అధికారులు, నేరాలు ఎక్కువగా జరిగే ప్రాంతాలు, హెల్ప్ లైన్ తదితర వివరాలు, కేసుకు సంబంధించిన సమాచారాన్ని తెలుసుకోవచ్చు. కమీషనరేట్ పరిధిలోని ప్రాంతాలను తెలియచేసే రూట్ మ్యాప్ దొరుకుతుంది. విదేశీయులు కూడా రిజిస్ట్రేషన్ చేసుకొనే అవకాశాన్నిఈ సైట్ లో కల్పించారు.

ధన్యవాదాలు

Thursday, July 10, 2008

విండోస్ రన్ కమాండ్లు

వివిధ అప్లికేషన్లు, అడ్మిన్ టూల్స్, కంట్రోల్ పానెల్, యుటిలిటీ లను డైరెక్ట్ గా Start --> Run నుండి ఓపెన్ చెయ్యటానికి ఈ క్రింద యివ్వబడిన విండోస్ రన్ కమాండ్లను ట్రై చేయండి

Applications:
calc - Starts Calculator
excel - Starts Microsoft Excel
explorer - Starts Windows Explorer
firefox - Starts Firefox if installed
iexplore - Internet Explorer
mobsync - Starts Microsoft Synchronization Tool
msimn - Outlook Express
mspaint - Starts Microsoft Paint
notepad - Starts Notepad
outlook - Starts Microsoft Outlook
powerpnt - Starts Microsoft Powerpoint
wab - Starts Windows address book
winchat - Starts Microsoft Chat
winword - Starts Microsoft word
wordpad - Starts Wordpad

Control Panel:
appwiz.cpl - Starts Add or Remove Programmes
control - Starts the Control Panel
control desktop - Opens Display Properties
control folders - Opens Folder Options
control fonts - Opens Fonts
control mouse - Opens Mouse Settings
control netconnections - Opens Network Connections
control schedtasks - Opens Schedules Tasks
control userpasswords - Opens User Accounts
firewall.cpl - Starts Windows Firewall
mmsys.cpl - Starts Sound and Audio Device Properties
netsetup.cpl - Starts Network Setup Wizard
powercfg.cpl - Starts Power Options Properties
sysdm.cpl - Opens Systems Properties
wuaucpl.cpl - Starts Windows Updates

Administration:
ciadv.msc - Opens Indexing Service
compmgmt.msc - Opens Computer Management
devmgmt.msc - Opens Device Manager
diskmgmt.msc - Opens Disk Management
eventvwr.msc - Opens Event Viewer
fsmgmt.msc - Opens Shared Folder Management
gpedit.msc - Starts Group Policy Editor
ntmsmgr.msc - Opens Removable Storage Management
perfmon.msc - Opens Performance Monitor
secpol.msc - Opens Security Policies
services.msc - Opens Service management

Utilities:
chkdsk - Runs Check Disk (Ex: chkdsk C:)
clipbrd - Opens Clipboard Viewer
cmd - Starts a Command Prompt Window
diskpart - Runs Microsoft Disk Partitioning Tool
drwtsn32 - Runs Dr.Watson Debugger
dxdiag - Runs DirectX Diagnostic Tool
eudcedit - Starts Private Character Editor
fsquirt - Runs Bluetooth Transfer Wizard
logoff - Logs Off User from Windows
msconfig - Starts System Configuration Utility
mstsc - Starts Remote Desktop Connection
osk - Starts On Screen Keyboard
packager - Opens Packager
regedit - Starts Registry Editor
shutdown - Runs Windows Shutdown Command
taskmgr - Runs Task Manager
tourstart - Starts Windows Tour

ధన్యవాదాలు

Tuesday, July 8, 2008

గ్రామీణ ప్రజలకు ప్రత్యేక పోర్టల్


గ్రామీణ్ ప్రాంత ప్రజలకు అవసరమయ్యే సమాచారాన్ని అందించే పోర్టల్ www.indg.in
ఇందులో వ్యవసాయం, ఆరోగ్యం, ప్రాధమిక విద్య తదితర అంశాల్లో సమాచారం అందుబాటులో వుంటుంది. ఈ-పరిపాలన సౌకర్యమూ వుంటుంది.C-Dac డెవలప్ చేసిన ఈ పోర్టల్ తెలుగు, తమిళం, హిందీ, మరాఠీ, బెంగాలీ మరియు ఆంగ్ల భాషలలో చూడొచ్చు.

ధన్యవాదాలు

Monday, July 7, 2008

XP లో Vista ఫీచర్స్

XP లో కూడా Vista ఫీచర్స్ పొందవచ్చు. దీనిని సంబంధించి నెట్ లో ఎన్నో సాప్ట్ వేర్లు దొరుకుతున్నాయి. ఇంతకు ముందు టపా లో సైడ్ బార్ గురించి తెలుసుకున్నాం. ఇప్పుడు XP లో మిగతా Vista ఫీచర్స్ ఎలా పొందాలో చూద్దాం...

1.టాస్క్ బార్ విసుఅల్ టిప్స్ (Taskbar Visual Tips):

Taskbar Visual Tips - టాస్క్ బార్ మీద వున్న విండోల చిన్న ప్రివ్యూ. టాస్క్ బార్ మీద వున్న ఐటమ్ ల మీద మౌస్ పాయింటర్ వుంచితే దానిని సంబంధించిన చిన్న విండో కనపడుతుంది. Visual Tool Tips సాప్ట్ వేర్ ని http://www.chrisnsoft.com/visual-tooltip/ నుండి డౌన్ లోడ్ చేసుకోవచ్చు.

2.విస్టా లుక్ కోసం (XP Themes):

custom Themes XP లో పనిచేయటానికి ముందుగా UXTHEME patch ఫైల్ ని http://www.softpedia.com/progDownload/UXTheme-MultiPatcher-Download-2369.html నుండి డౌన్ లోడ్ చేసుకోవాలి. ప్యాచ్ ని రన్ చేసేటప్పుడు విండోస్ ఫైళ్ళను రిప్లేస్ చేస్తాననే వార్నింగులను క్యాన్సిల్ చెయ్యాలి. సిస్టం రీస్టార్ట్ చేసి కస్టమైజ్డ్ థీమ్స్ వాడుకోవచ్చు. డౌన్లోడ్ చేసిన థీమ్ ఫైల్ ని C:\Windows\Resources\Themes లో సేవ్ చేయండి. Display Properties విండో కి వెళ్ళి థీమ్ సెలెక్ట్ చేసుకోవాలి. థీమ్స్ కోసం www.themexp.org మరియు www.deviantart.com చూడండి.

3.విస్టా స్టార్ట్ మెనూ (Vista Start Menu):

విస్టా స్టార్ట్ మెనూ ఏమ్యులేటర్ ని http://fogelsoft.extra.hu/forum/ లేదా http://lee-soft.com/ నుండి డౌన్లోడ్ చేసుకోవచ్చు.

4.ప్లిప్పింగ్ విండోస్ (Flipping Windows):

టాప్ డెస్క్ అనే యుటిలిటీ మల్టీటాస్కింగ్ కి వుపయోగపడుతుంది. దీనిని http://www.otakusoftware.com/topdesk/ నుండి డౌన్ లోడ్ చేసుకోవచ్చు. టాప్ డెస్క్ ఇనస్టలేషన్ చేసిన తర్వాత [Windows Key]+[Tab] కీ లను ప్రెస్ చేస్తే రన్ అవుతున్న అప్లికేషన్ల అన్నిటినీ ఓపెన్ చేసి చూపిస్తుంది. కావలసిన అప్లికేషన్ ని సెలెక్ట్ చేసుకోవచ్చు.

5.ఫెర్ఫార్మెన్స్ బూస్టర్ (Performance Booster):

విస్టా లో USB Flash drive ని అదనపు మెమొరీ గా వుపయోగించుకోవచ్చు. XP లో ఆ ఫీచర్ ని పొందాలంటే బూస్టర్ సాప్ట్ వేర్ ని www.eboostr.com నుండి డౌన్ లోడ్ చేసుకోవచ్చు. ఇది ఫ్రీ కాదు.

Friday, July 4, 2008

XP లో Vista ఫీచర్స్ - సైడ్ బార్ (Google Desktop)


విస్టా వచ్చి సంవత్సరంన్నర అవుతున్నా ఎక్కువ మంది యూజర్లు ఎక్స్పీ నే వుపయోగించటానికి ఇష్టపడుతున్నారు. కారణం ఏదైనా విస్తా ఫీచర్స్ మాత్రం ఎక్స్పీ లో పొందాలనుకొంటున్నారు. విస్టా ప్రొడక్టివిటీ ఫీచర్స్ లో సైడ్ బార్ ఆకర్షణీయమైనది. వాతావరణ, వార్తలు, సమయం, మెయిల్ మెదలగు విషయాలకు సంభందించిన ఇనస్టంట్ ఇన్ఫర్ మేషన్ కోసం సైడ్ బార్ వుపయోగపడుతుంది. XP లో కూడా సైడ్ బార్ పొందాలంటే నెట్ లో ఎన్నో సాప్ట్ వేర్లు లభిస్తున్నాయి వాటిలో ఒకటే Google Desktop. దీనిని http://desktop.google.com నుండి వుచితం గా డౌన్లోడ్ చేసుకోవచ్చు. ఇనస్టలేషన్ చేసిన తర్వాత సిస్టం ట్రే లో వున్న Google Desktop ఐకాన్ మీద మౌస్ రైట్ క్లిక్ చేసి సైడ్ బార్ సెలెక్ట్ చేసుకోవాలి. ఇప్పుడు XP లో Vista సైడ్ బార్ రెఢీ... సైడ్ బార్ లో + గుర్తు మీద క్లిక్ చేసి గాడ్జెట్లు యాడ్ చేసుకోవచ్చు.

Google Desktop సైడ్ బార్ గా మాత్రమే కాకుండా ఫైల్ ఇండెక్సింగ్ కు మరియు సెర్చ్ చెయ్యటానికి కూడా వుపయోగపడుతుంది. సిస్టం లో ఫైల్స్ ని సెర్చ్ చెయ్యటానికి, సైడ్ బార్ పై క్లిక్ చేసి [Ctrl] కీ రెండు సార్లు ప్రెస్ చేస్తే Google సెర్చ్ విండో ఓపెన్ అవుతుంది. ఇది నార్మల్ విండోస్ సెర్చ్ కన్నా వేగంగా పనిచేస్తుంది. ఇది కాకుండా సైడ్ బార్ లో వున్న టెక్స్ట్ ఫీల్డ్ ని కూడా వుపయోగించుకోవచ్చు.

ఢన్యవాదాలు

Thursday, July 3, 2008

సిస్టమ్ త్వరగా షట్ డౌన్ లేదా రీబూట్ చెయ్యటానికి....


Start ---> Shut Down కి వెళ్ళి సిస్టం షట్ డౌన్ చెయ్యకుండా ఒక చిన్న కమాండ్ తో ఎలా షట్ డౌన్ చెయ్యాలో చూద్దాం...
ముందుగా shutdown -s -t 0 అనే కమాండ్ తో షార్ట్ కట్ క్రియేట్ చెయ్యాలి. దీని పై మౌస్ తో డబల్ క్లిక్ చేస్తే ఎటువంటి కన్పర్ మేషన్ డైలాగ్ బాక్స్ లేకుండా సిస్టమ్ త్వరగా షట్ డౌన్ అవుతుంది. షట్ డౌన్ కి ముందు టైమ్ సెట్ చెయ్యటానికి ఈ కమాండ్ లో ’౦’ (సున్న) బదులు ఏదైనా వాల్యూ యివ్వవచ్చు.

షట్ డౌన్ ని ఎప్పుడైనా ఎబార్ట్ చెయ్యటానికి shutdown -a కమాండ్ ని వుపయోగించవచ్చు.

అదేవిధంగా సిస్టం రీబూట్ / రీస్టార్ట్ చెయ్యటానికి shutdown -r -t 0 కమాండ్ వుపయోగపడుతుంది.

ధన్యవాదాలు

Tuesday, July 1, 2008

ఫ్రీ ఎస్.ఎమ్.ఎస్ పంపే వెబ్ సైట్లు


ఇండియాలో ఎక్కడికైనా ఫ్రీ గా ఎస్.ఎమ్.ఎస్ పంపటానికి ఈ వెబ్ సైట్లు చూడండి http://wwwb.way2sms.com/content/index.html, http://www.160by2.com/